No More Blinkies: Replacing the NES’s 72-Pin Cartridge Connector
November 7th, 2005 by Benj Edwards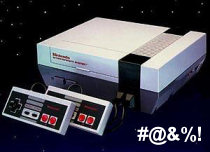 It’s an endless struggle; an epic, no-holds-barred wrestling match: Man vs. NES in a fight to the death. Or at least, in a fight to get your NES games working on that old front-loading NES. You push, it blinks. You pull, it blinks. You blow, you sneeze, you use q-tips, cleaning kits, and wow…it works? You see the title screen, but it’s still a little flaky. Things might be a little garbled, so you hit reset and it looks OK. Then an hour into playing, you accidentally tap the console and the game freezes, forcing you to start your Metroid game all over again. Blast! It’s hard to remember that your NES ever worked on the first try. There’s a fine art to actually getting a game running on an old NES. It takes a lot of patience and a certain flick of the wrist. I used to impress people at parties with my NES-charming abilities, and boy did the ladies love it.
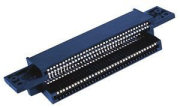 The crux of this classical problem is a special connector inside the unit that wears out from repeated usage over the years. It was designed in such a way that a game cartridge can be inserted at a slight angle with little resistance, then pushed down in the spring-and-latch loading tray inside the NES, bringing the cartridge’s contacts in full contact with the connector’s pins. It’s sort of like a cartridge port version of a ZIF (zero insertion force) socket (Hmm.. Zero Insertion Force sounds like it would have been a good title for a Japanese NES game). This mechanism seems like a great idea on paper — there’s no brute-forcing the game in, and it’s easy to pull the game out of the slot when you’re done. But this delicate dance between cartridge and machine repeats it self over and over again throughout the years until the the pins in the internal connector start to lose their flexibility and springiness. And when they get slowly bent down from repeated usage, the physical contact made between the connector and the cartridge itself suffers, making it hard for the NES to read the data on the cartridge. On top of that, you have years of dust, dirt, and corrosive build-up on both the internal connector and the game itself. As a result, you get…Dum Dum Dum…The Blinkies.
Back in the day, we just threw up our hands and suffered with the problem, never really thinking there could be a solution — other than buying a later model top-loading NES (released in 1993), which eschewed the high-class ZIF mechanism for a more plebeian (and low cost) approach. And as we all now know, recent attempts at NES replacements just don’t cut it. But a few years ago, enterprising young lads on Ebay started selling replacement 72-pin connectors (the cartridge port on the NES has 72 pins) for afflicted front-loading NES systems. The concept is this: you buy a new connector, you disassemble your NES and replace the old one, and supposedly the blinkies will be gone. So about three months ago, I finally decided to buy one and try it out. Sellers want anywhere from $7 to $12 (!) a piece for these things, which is a lot of markup considering they’re probably being churned out by Chinese factories at a cost of a cent a piece. However, they are quite unique in the world of connectors and I (in my limited experience) know of no other device that has ever used such a component. So until we find out who these sellers are smuggling these things from, the gaming public will have to put up with the high prices.
 I took a dive and went with a $7 connector from HitGaming.com. I bought it through Ebay, although HitGaming has its own online store too. The choice of a vendor for these things probably matters very little. I highly suspect that all of them come from the same manufacturer somewhere in the Far East. Just go for the cheapest price. HitGaming.com’s 72-pin connector arrived in a little plastic baggy with a cheaply done single-sheet print out of NES disassembly and connector installation instructions. Having disassembled a number of NESes before, I didn’t have any trouble with the installation — it’s very easy as far as console fixes go. But for those who are not experienced in taking anything apart, the operation might be a tad tricky. HitGaming.com also has extended installation instructions online with more pictures, which is definitely handy for the inexperienced. I’m not going to go into detail about the assembly and installation instructions myself, since the method to do so has been repeated many times over on the web.
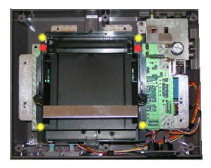
I took everything apart — first the main chassis, then the RF shield, then they tray mechanism, then unplugged the old connector from the mainboard, hollowed out some incompletely drilled screw holes in the new connector, and plugged it in to the mainboard. Then I screwed only the tray mechanism back so I could test it before completely putting it back together. If I had to give one tip for the process, it would be this: there is a black plastic lip/slot on the bottom of the black spring-loaded tray that is designed to go under the front, bottom edge of the main board. Make sure you slide the tray mechanism in parallel to the mainboard and that the lip goes under the board, or else the tray will stick up too much and the spring-locking mechanism won’t work properly. After successful testing, reassemble everything else in reverse order, taking care not to mix up which screws go where.
The new 72-pin connector in my NES succeeded in eliminating the confounded blinkies. It should be heavily noted that your game cartridges need to be cleaned before inserting them into your newly refurbished NES, or else you’ll still have trouble getting them to work (and you’ll get your new connector dirty).
There was only one problem with my connector, though. The whole ingeniously-designed ZIF feature of the tray-loader was somehow negated by the new connector. It requires a strong force to push the cartridge in, and a Herculean effort to remove the cart from the system. The sheer gripping power of the new connector will surely lessen over time and use, but it’s definitely inconvenient to have to struggle to pull a game out. It’s a disappointment, but at least a cleaned cartridge works on the first try. Also, you can practically throw the NES across the room and not have the game lock up on you; the contact is that strong. Still, I wouldn’t try it on purpose (although it might happen spontaneously while trying to get past the first stage of Ghosts ‘N Goblins).
Note: Below, I am reviewing my particular connector, not the whole concept of replacing your old one.
| HitGaming.com Replacement NES 72-Pin Connector | |
| Good Features: | Seemingly good quality construction, same dimensions as old connector. Eradicates the blinkies if installed correctly and used with clean carts. Installation instructions provided on paper and online. |
| Bad Features: | Overpriced. Skimpy installation instructions. Grabs on to your carts for dear life and won’t let go. Requires disassembly and possible breakage risk in the process — not a good option for the technically unexperienced. |
| VC Rating: (10 Being Best) |
[ 6 out of 10 ] Shiny Marbles |


November 7th, 2005 at 6:33 pm
[…] With this thing being such a bust, check out my article on replacing the 72-pin cartridge connector on your NES and elimitating the blinkies. […]
November 7th, 2005 at 7:58 pm
You can use Stabilant 22, which is a contact enhancer, to lubricate your new 72-pin connector, so that carts slide more easily in and out of the system. Stabilant 22 is a liquid polymer that increases the conductivity of electrical contacts without the possibility of short-circuiting contacts by using too much stabilant. It is think, clear, and slimey, and it prevents corrosion.
November 7th, 2005 at 10:21 pm
Thanks for the great tip, Guy. That stuff sounds awesome. Can you point me (and Vintage Computing readers) to a good place to order Stabilant 22?
November 8th, 2005 at 3:43 am
OK you convinced me. I am going to order one and refurbish my old Nes.
November 9th, 2005 at 6:37 pm
Hi, my NES would only run two carts and give me the blinkies on the rest. So I decided to get a new 72-pin connector. After having it installed and all the carts extensively cleaned, it STILL only wants to run the same two carts as before. I’m kinda baffled as to what could be wrong…
November 10th, 2005 at 12:17 am
Fleg, I’m not sure what the problem is. The first thing I’d do is test all the same carts on a different NES (if you have one available), then you can determine whether the problem lies with the NES or the carts themselves. If you installed the new connector correctly and the games are clean and not damaged, then I’m not sure where to look next. Try using the games through a Game Genie (if you have one) and see if they work. Maybe Guy or someone else reading this has some ideas that could help. Anyone?
November 10th, 2005 at 7:58 pm
Thanks for the reply. Unfortunately, I don’t have another NES I can test on, but I’m thinking of just getting another one, since they don’t go for much these days. I don’t think it’s the carts, since not even my brand-new MidiNES cart wants to run. I suppose the new connector could somehow be defective… not easy to know. I did insert some unclean carts right after I had installed it though, but does it get dirty that fast?
November 10th, 2005 at 9:47 pm
Might I ask what carts are the ones that don’t work? And which are the carts that do work? Also, MidiNES is obviously recent homebrew software, so there might be compatibility issues there (or a defective cart?). Inserting a couple of dirty carts into your refurbished NES shouldn’t damage anything. I hope you get this sorted out. You probably should pick up another NES if you can, just to test.
November 12th, 2005 at 12:24 am
Carts that work: Mario Bros/World Cup/Tetris and Mario Bros 😛
Carts that don’t work: Mario Bros 2 and 3, Metroid, Mike Tysons Punchout, Hoagans Alley, Gumshoe, Duckhunt/Mario Bros and MidiNES.
I can see the opening screen on almost all the carts between the flashes. It’s like somebody is pressing reset constantly.
I’ve bought a new NES on ebay, hopefully it’ll clear some things up when I get it.
November 12th, 2005 at 2:54 pm
Based on what you describe, I can only suggest these options: either your games aren’t really clean, the games are damaged in some way, or your new connector is defective or has been installed improperly. The constant resetting is a symptom of the NES not being able to read the cart properly. Without inspecting the NES and the games themselves, I have no idea. So it will be important for you to test your games on the new NES you’re buying and see what happens.
January 12th, 2006 at 9:01 pm
I don’t know if anyone’ll read this, but I actually got the NES working yesterday. All I had to do was to disable the dreaded CIC chip, and now everything works fine! Yay!
January 12th, 2006 at 9:27 pm
Congrats, Fleg!
February 28th, 2006 at 11:57 am
I have a blinking problem. I dug out my son’s old NES that I bought in 1986 so my grandson could play and yes I wanted to play again too. If I blew on the carts they would work for awhile. I got on ebay and bought one that the seller said had a new gold 72 pin put in with NO blinking. I won the bid and got the console and 14 games (now I have about 50 games). Well, it blinks of course. I bought a new 72 pin connector for my son’s and installed it. it still blinks. Now I have two NES that blink. Does it really work to install these new connectors. I see a lot of people selling them but I don’t see anyone saying they work after installing them so I’m thinking it’s more than the 72 pin connector. what’s the CIC? There is one game that works though on the NES I just bought. What I noticed about this one game is that the part that goes into the 72 pin connector is thinner then the other games. I have no problem with that game at all. None of the other games will work at all without blinking.
February 28th, 2006 at 2:35 pm
Hogtrashhd,
The key step you’re forgetting is to thoroughly clean your games. And by clean, I mean to clean the gold contacts on the bottom of the cartridge. How do you do this? I recommend getting a bottle of isopropyl (rubbing) alcohol and some cotton swabs (i.e. Q-tips). Dip a cotton swab in the alcohol and then rub it thoroughly back and forth across the connector pins on the cartridge. Make sure you do both sides of the cartridge’s connector. You’ll likely notice years of dark brown gunk coming off onto the cotton swab. Repeat this on the cartridge, changing swabs when dirty, until you don’t see any dirt on the tip after you rub it along the connector. Then do this to all your cartridges and you’ll likely have less blinkies to plague you. Make sure there the games are fully dry and there are no left over cotton fibers on the connector before playing them. If you have a NES cleaning kit, then after you clean your carts would be a good time to clean the connector inside the NES too. Otherwise, don’t sweat it, just clean the games and they should work better. Good luck!
August 22nd, 2006 at 3:56 am
The CIC chip, as far as I know, is the 10NES chip. The NES lockout chip. Using nothing more than a pair of wire cutters and a screwdriver, you can disable this. It may be illegal in your state or country due to the Digital Millenium Copyright Act, since technically the 10NES program is a copy protection feature, and the DMCA doesn’t really want you to do that.
But doing so got rid of the blinkies on a few consoles I’ve seen with new clean connectors. This chip might just be getting bad over the years. Or, it could be the chip is bad in the games. In either case, killing the 10NES chip is the first step. Google for “how to disable NES lockout chip”.
November 22nd, 2006 at 4:05 pm
Yo, i hear that when u use rubbing alchohol to clean games, it leaves a type of like coating that they say in the long run hurts the game connection… is this true or do some people need to get their facts straight?
November 22nd, 2006 at 4:59 pm
Schmitty,
It sounds like those people are mistaken. If you blow on a cart with your breath, it will leave a moisture residue which could lead to corrosion, but rubbing alcohol evaporates quickly (and completely, as far as I know) and has never caused me any trouble.
By the way, Nintendo themselves recommended using rubbing alcohol with their official NES cleaning kits (and I have a few), so that sounds like a pretty good endorsement to me. Just don’t dunk your entire cartridges in the stuff and you’ll be fine. 🙂
November 23rd, 2006 at 3:34 pm
Thank u RedWolf, your help is greatly appreciated….(-:
There’s one more thing that’s driving me crazy. i bought the pin, i assembled it all correctly, i took dissabled the lockout chip, and i’ve cleaned all my games so there’s absolutely NO black or funny colors coming off onto the Q-TIPS but i still get the blinkies and i can’t get any of my games to work except for two:
games that work: Mega Man 4, and Teenage Mutant Ninja Turtles 2 the arcade game.
games that DON’T work )-: Super Mario 3 and 1, Mega Man 3 and 5, Teenage Mutant Ninja Turtles 1, The Legend of Zelda 1, and Metroid.(when i had a good day on making games work with my old pin connector, these games work fine)
So, I was wondering if when every one who got their nes’s fixed and they are working nicely, do u still have to monkey around with the game in the connector of do u just stick it in and it works? by the way, i bought my 72 pin connector from estarland.com but i don’t know if this helps if they’re all bought from the same spot in the far east. if you do have to play with the cartridge to get them working what are good methods, and were can i get this Stabilant 22.
Thanks,
November 24th, 2006 at 11:46 am
Schmitty,
The problem you may be having is with disabling the lockout chip. Some games might actually need it to work properly. I don’t really know for sure though, so I’m just speaking out of my butt on this one — I’m sure someone else more knowledgeable than I on the matter could tell us.
As far as the new connector goes, it’s not a 1 for 1 replacement of the old one — they’re designed more like any other symmetrical cartridge connector — that is, they’re designed to have the cart inserted at a 90 degree T and have it work, as opposed to the old NES’s ZIF connector, which had springy pins on one end to accommodate the black cart raising/lowering mechanism. As a result, it’s not always going to work 100% like the original when it was new. Even with my new connector, I still have to fiddle with the games sometimes to make them work (even when they’re clean), but I don’t have to fiddle with them nearly as much as I did with the old one. And when they’re properly seated and working in the NES with the new connector, they’re much more stable and harder to reset or lock up just by bumping into the unit.
Anyway, I hope that helps. You should try replacing the connector on a NES without disabling the lockout chip next. After all, it’s possible you made a mistake while disabling the chip (whatever that entailed) and that could be messing things up as well.
Good luck!
January 22nd, 2007 at 7:34 pm
hey, i bought this new 72 connector form ebay and i installed it on my blikey non working nes. i finished instalation and tried out a game. the first one i tried blinked. i tried the same exact game but different disk and it went on w/o blinking but all i saw was a gray screen. i cleaned both the motherborg conn. and the games. i also tried some of the others. nothing works.
February 6th, 2007 at 10:43 am
I sell lots of NES systems and games on eBay. Here’s the deal. I never replace the 72 pin connector. A good cleaning kit will take care of that and you won’t need vice grips to remove the game. The problem I’ve found is with the game cartridges themselves. Cotton swabs and alcohol will not totally clean the cart. I bought the special bit (available of course on eBay) that allows me to open the game cart. The circuit board is then exposed and I use a scotch-brite pad to polish the contacts, followed by a quick blast of dry compressed air (canned air works fine), followed by a light rub down with alcohol. Works everytime. Hope this helps.
April 18th, 2007 at 12:34 am
Hey everyone! I have a problem! My boyfriend just got me an original NES system he foud from someone on Craig’s List, when he picked it up from the guy he said they tested it out and it worked buuut when I got home and hooked it up nothing happened except that the power light kept blinking and this was before I had even put a game inside of it sooo i dont think its a matter of needing to clean any games bc I didnt even put anything in them i just wanna play Super Mario and Duck Hunt lol if anyone has any suggestions please help me! THANK YOU:)
April 19th, 2007 at 11:53 am
Tiffany,
Place the game cartridge inside the NES before turning it on. That might help. If it still doesn’t work, you can give us more details.
January 3rd, 2008 at 10:35 am
Dear all,
buying a new 72 pins connector on websites like ebay is totally unnecessary. You can just contact your national (or regional) nintendo office and ask (via email or whatever) pretty please for a replacement 72 pins connector. They send them out for free, even without shipping costs. Also they are packed in bubble wrap envelopes. However, if you have no clue as to how to replace your 72 pins connector you have a problem since they don’t ad any instructions. Whit the smallest amount of technical skills you are able to do it your self. I tried this once, it worked perfectly. I live in the Netherlands, perhaps other nintendo offices aren’t as cooperative but at least give it a try.
I used this replacement connector on my old NES which I used and used for years. I must say I don’t really mis blinky. He is gone, and hopefully never coming back. Cleaning your cartridges with ethylethanol work great, do this at least twice a year.
PS: If you want to play duckhunt make sure you don’t have those nice plasma/flatscreen TV’s. It won’t work. You need the old fashioned crappy 50 Hz televisions. If you don’t have one, pick one up at your local second hand dealer (you can even get them for free, if your lucky). Don’t pay more then E 10.00 or $ 14.00.
greetings,
Wouter
January 14th, 2008 at 10:36 pm
Hi all,
I’m thinking of buying an original top-loading NES (if I can find one!) Is this system working as good as the SNES? I have bought an used SNES about two years ago and this thing works perfectly. Will the top-loading NES blink too because the cartridges get dirty, or is it guarateed to play any game like the SNES does?
Thank you.
February 16th, 2008 at 4:33 pm
I replaced the 72 pin connector on my nintendo and cleaned everything possible and it worked great for a couple of weeks. Then one day it just stopped working all together. I didnt drop it or do anything to cause it to break. So I took it back apart, cleaned everything again, and checked everything I could think of, but it all seems right. So I resorted to the disabling of the lock out chip method, and of course it still doesnt work. all it does every time on every game is just blink a grey screen like theres not a game in it at all. Im guessing the motherboard must be shot and I just need to get a new one, but if anyone has any suggestions please let me know. Im dying for a game of super tecmo bowl. And yes I did clean the games as well. Trust me, everything that could possibly be cleaned is clean. So I know thats not the problem.
March 9th, 2008 at 2:58 pm
why those peoples from hitgames will not also sells 72 pin connectores made from titanium ?offcourse it would be very expensive but those connectors will never corrode over tome,and it is also the strongest matel.
also pushing games down into it,s possition can become absolete,this since the cartrides can also make contact with the connector once only inserted.
so this can solve the problem once for all and forever.
March 19th, 2008 at 11:14 am
for the guy that only could get 2 games to work. First make sure your games are super clean this requires older games a philips head screwdriver newer nes games 90 -93 you have to get a special nes cart opener they are only 4 bucks take out the main board use a eraser not on a pencil but one of those big pink ones and using almost brute force erase on the contacts both sides part 2 make a solution of 50% alochol and water in a throwaway 8oz cup use qtips and make brushing strokes back and forth on the contacts (the qtips dont need to be wet just damp you will probaly go through bout 10 to 20 of these after no eraser shavings or dirt is coming off of them dry off with a qtip not dipped or let sit for 10 min reassemble cartridge rinse and repeat this for all of them. Part 2 testing your carts
1st before you do anything to the nes test your cleaned carts on the original nes still blinking not working take apart the nes and replace the 72pin connector. if games are still not working this time you might get a grey or green screen on all of em or some 3rd option (this is what the yobo is good for) order a yobo normally 20 bucks or so depending on the site person etc. wait for it to come in the mail test all carts on it if my thoughts are correct all will work perfectly now I know you dont want to play on that piece of junk but they are great for game testing and “nothing else” if you have another nes laying around which you probaly dont find one online that is tested in good working condition and that should fix you right up rare but can happen if the yobo test shows none of the games working then your carts have gone bad over the years can happen but rare 9 times out of 10 on this problem is that the nes motherboard has a short (meaning throw it out cant be fixed as far as I know) or the cpu has gone bad same thing cant fix and a new one will be fine if the carts fail the yobo test then the carts are bad but you have a fully working nes just need to ebay the games you want and your good to go. These are the exact steps I took on my gaming collection back in 2006 only 3 out of 100 carts were bad the rest played on the yobo and my nes had more problems then the connector I ebayed a nes in good working order and everything has played fine since.
August 6th, 2008 at 9:55 pm
While there are a lot of sites out there that sell a 72 Pin Connector, none can offer the repair personnel experience and dedication to technical customer support that we can at http://www.nintendorepairshop.com.
I started the business 4 years ago, and have made it my focus to provide free nintendo repair resources to those out there that want to relive their game playing youth. We offer the following special services/products for NES Repair:
Professional Mail-in NES Repair Service
http://www.nintendorepairshop.com/shopdisplayproducts.asp?id=153&cat=NES+Repair+-+Service
Custom Made NES Self Repair Kit
http://www.nintendorepairshop.com/shopexd.asp?id=78&bc=no
New 72 Pin NES Connector
http://www.nintendorepairshop.com/shopexd.asp?id=63&bc=no
Free Nintendo Repair Guides
http://www.nintendorepairshop.com/shopcontent.asp?type=Nintendo_Repair_Center
July 15th, 2009 at 7:34 pm
http://www.retrolution.dk/nesfix/VisualStepByStepGuideToRepairingYourBlinkingNES.pdf
August 20th, 2009 at 10:07 pm
My son tried the new connector, still blinking led.
Read your chat and tried the cleaning of the mainboard connection.
This worked, and I’ll bet from my experience with automotive modules,especialy those bathed in coke-a-cola, that what happens to some counsoles is the corosion grows across the pins shorting the board.
We cleaned with alchohal and q-tips till new q-tip stayed clean, also scrub up and down divide between gold strips.
I also put a light coat of dielectric grease(available at auto parts) but I bet the compound mentioned above works too.
This will prevent corosion here, but don’t put on the cartridge contact as this will just goo dirt and grime to the exposed connections.
Workin good, good luck!
Brin and Andres
May 9th, 2010 at 6:29 pm
Holy crap; that CIC chip disablement actually worked! I replaced my 72 pin connector and half my games were totally still not working. I disabled the CIC chip just now, and they ALL WORK without a hitch. The work so good; I can’t even believe it! Thank you!
October 6th, 2010 at 5:01 am
I have to say, really well written article, for one. I’ve been meaning to replace the 72-pin connector in my NES for years now, but was always afraid of doing it because I’ve had the thing for over 20 years, and it’s served me well.
Although, not to dispute your article or any of the comments in it at all, I have to say the most sure-fire, 100% fool-proof method I’ve ever had of getting a game to work 100% of the time is to simply use a Game Genie. I have been playing my NES religiously for the past 6 years now (it was in hibernation for most of 1996-2003), at least once a week, and get everything to work on the first go pretty much every time.
I only make this recommendation for people who are leery about taking apart their NES, particularly if you don’t know what you are doing or don’t quite have the finances to replace your console is you massively screw something up. It’s a little bit more expensive to purchase a Game Genie (and you can only get them off eBay), but I have found the results to be the same, and no technical know-how is required. I’ve run Adventure Island II for two days straight (I left it paused when I left the room once, and completely forgot about it…) and still came back to a perfectly working game. I even picked up where I left off, no fuzzies or anything.
Still, it’s always a good idea to replace the pin connectors if you have the means. After 20 years, some of those contacts have to be pretty worn out by now.
November 14th, 2010 at 6:23 pm
Hello all. I just wanted to add my 2 cents to the board discussion. When cleaning your NES carts, the thing that i have found that cleans the best, besides the eraser, is a metal polish/cleaner called Brasso. You can get this stuff at any store for cheap. You just rub a little bit on the contacts and polish them with a static free cloth and you will be amased at the grime that comes off. Try the alcohol and swabs first and then use the brasso and you will see how much crap comes off that you can’t see even after cleaning with alcohol. After polishing the contacts use the alcohol swabs to clean off any residue. THis works for all cartridge games.