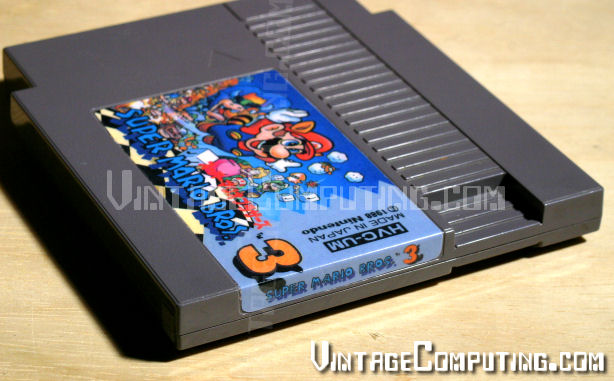
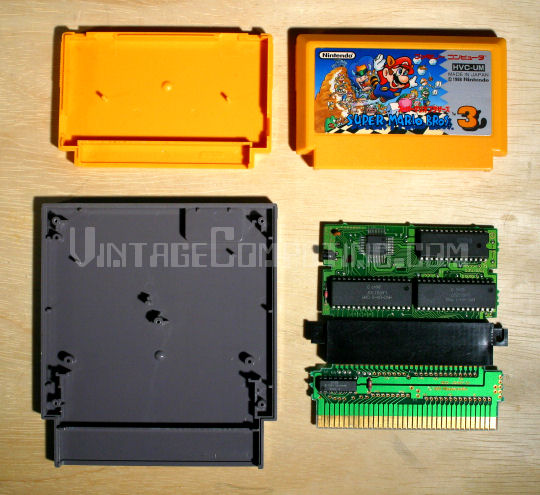
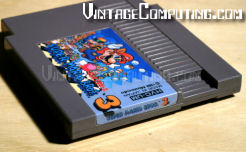
 In the VC&G article How to Tell if a Copy of Gyromite has a Famicom Adapter in it, I discussed how certain early NES game cartridges, especially Gyromite, have Famicom to NES converter boards built into them. Near the end of the entry I suggested that one could use such a board and an empty NES cartridge case to build a permanently-converted Famicom game for play on a regular American NES. Well, last week, I decided to actually do it. I chose a common Famicom game, the Japanese version of Super Mario Bros. 3 as my first guinea pig. There aren’t that many notable differences between the US and Japanese versions of SMB3, so this sort of game conversion would be better suited to a particularly good game that was never released in the US, or another game with more important differences between the US and Japanese versions. I don’t have that many Famicom games, so hence the choice.
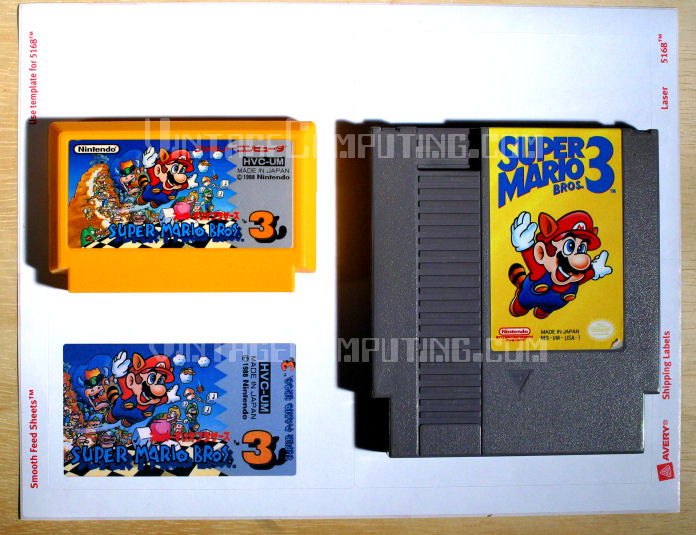
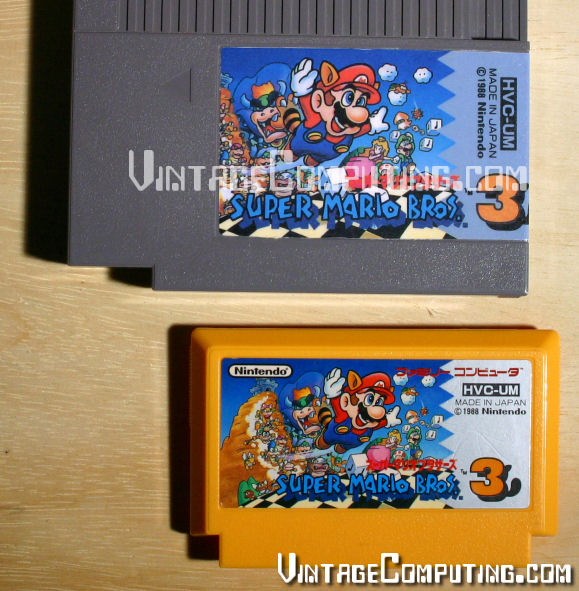
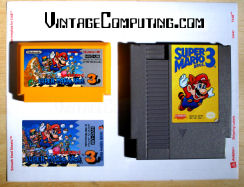 The project wouldn’t have been much of a project if I hadn’t made a custom label for the cartridge. That is the only step in such this conversion that required any serious labor (unscrewing screws isn’t that hard). First, I carefully measured the dimensions of a regular NES label (approximately 2.125″ x 3.8125″ to save you some time). Actually, I ended up using a second measurement in millimeters, but I forgot to write that down. Then, for the primary label artwork, I decided to scan the label of the Famicom SMB3 cartridge and start with that. I edited it in a number of ways, erasing some Japanese text that got in the way of my design, flipping a few things around, and making it fit regular NES label dimensions. I used a modified SMB3 logo from the game’s title screen for the title on the spine. After a few hours of tinkering, the label design was done. And for your notes, the final label is 650 by 1146 pixels at 300 DPI.
Next, I had to figure out what sort of adhesive paper I would actually print the label on. I happened to have some Avery 3.5″x5″ self-adhesive labels on 8.5″x11″ computer printable sheets lying around (Avery number 5168) that would do just fine with a little trimming. I also had some clear, self-adhesive laminate sheets lying around that would give my label a more professional glossy look. There are probably a million better ways to print a custom NES label with different materials, but I just used what I had on hand.
 I did some tests with regular paper first to make sure my label would fit. Then I set up the page margins to print the label properly on the Avery sheet and printed it out in a high quality photo mode on my ink-jet printer (nothing special at all — just an Epson Stylus Photo 820). Then I went to work removing the old label on the Gyromite cartridge. I have eight copies of Gyromite, so this was no big loss. The best tip I can give you for label removal is to use lighter fluid (naphtha). It works as a powerful solvent without damaging plastics — the adhesive on just about any label dissolves in it and then you can peel the label off, sometimes with no trouble. Squirt some on there, wait for it to soak in and slowly start peeling with your finger nail or a hard plastic tool (so you don’t scratch the case). An important thing to know is that you should immediately wipe up the lighter fluid and adhesive residue you get the label off. If the lighter fluid evaporates (and it evaporates pretty fast), the adhesive will be left behind and your cartridge will be sticky again. You want to get the cartridge clean and smooth for the new label you’re about to put on. Also, remember not to juggle flaming fire-sticks while doing this at the same time.
So, now we have a clean, young, blank and impressionable cartridge upon which to impart our new label. The next step in the label process, after applying a laminate over the printed Avery label, is to actually cut the NES label out of the bigger self-adhesive page you printed it on. You can use an X-Acto knife for accuracy, scissors if you’re impatient, or perhaps a guillotine-like paper cutter for straight edges. I did mine a little sloppily, which I regret. The rounded corners of the label are hard to cut out properly. Also, since my design had no bleed, (a printing term for an image purposely going outside of the designed cutting boundary) it was difficult to cut precisely along the label’s line without including any white (from the surrounding unprinted material) on the edges. My recommendation: if you have the luxury of designing big artwork that can bleed a bit off the edges, make it bleed and you’ll get a much better result when you cut it (sounds gruesome, doesn’t it?). Although with a bleed you’ll need to have either a NES-label-sized blank cutting template or a faint outline printed out on the label to tell you where to cut.
 Ok, enough of the cutting. After you have the final label, it’s time to apply it. Carefully peel off the backing from the self-adhesive label you’ve created, and start applying the label on one end (I chose the bottom of the recessed label space on the cartridge face), making sure to slowly, evenly, and firmly push the label down so you don’t get any waves, wrinkles or bubbles in the label. Also, the label will obviously have to bend around the cartridge from the spine to the face, or vice-versa, so be careful about that too.
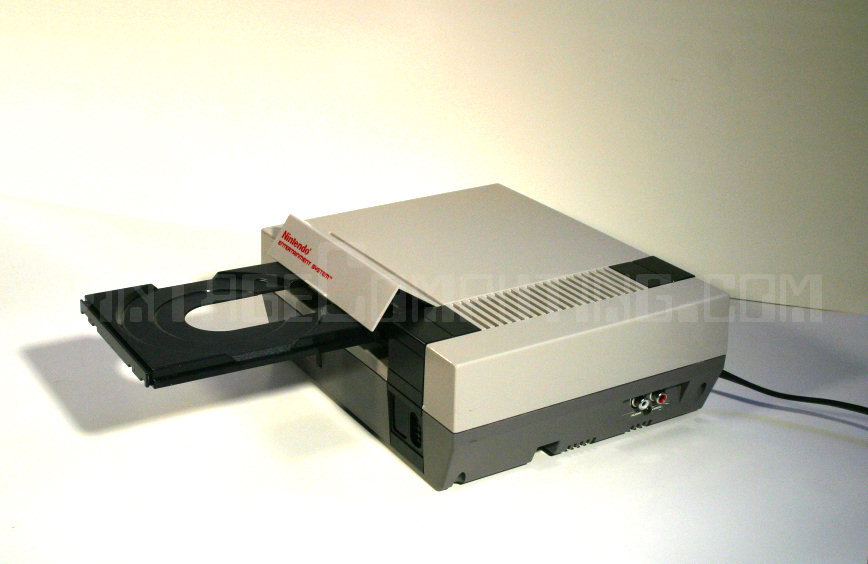
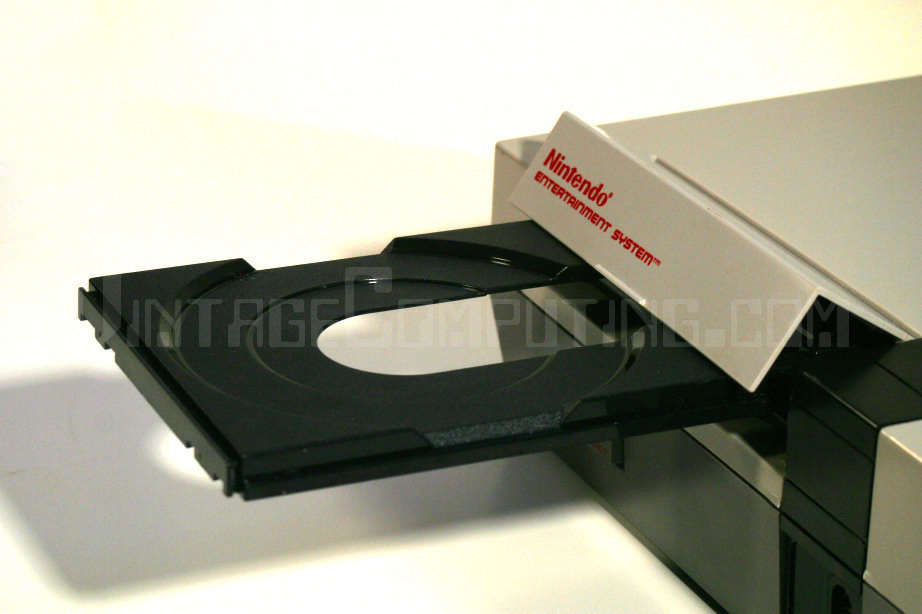
Once you’ve applied the label, you’re almost finished! Well, except for one very important detail: you actually have to get the game inside the cartridge to match your new label. Cracking open a traditional Famicom cartridge without breaking any plastic tabs is not easy (some don’t use any screws). I’m not even going to try to describe how to do it properly other than to say that there were four tabs locking into place on my Super Mario Bros. 3 Famicom cartridge: two at the top, and one on each side (see the picture for positions). Your best bet for dismantling a cart without breaking anything is to use a very flat, thin, but wide-bladed screwdriver to try to pry it open. If all goes well, then you can always change your mind and put the Famicom board back into the old case. If you break a tab, it will still hold together anyway. But if you accidentally rip the whole thing apart, then I guess it really will become a permanently converted Famicom game.
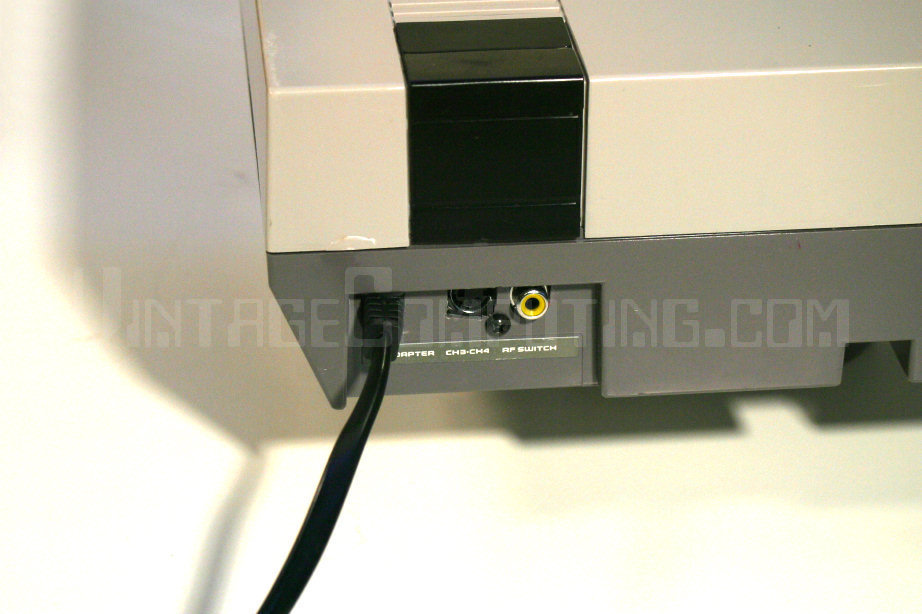
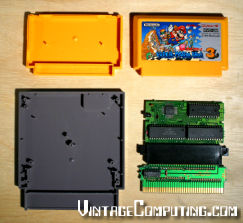 You will also have to disassemble your Gyromite cartridge (the one with the converter board in it). They typically have five screws that require a small, flat-bladed screwdriver for unscrewage (that should be a word). After that, you’ll have to unscrew the two screws that hold the Gyromite ROM board and adapter assembly down on the face half of the cartridge. Then, unplug the Gyromite ROM board from the connector on the top assembly and set it aside, feed it to your dog, or play it in your Famicom — we won’t be needing it anymore. Get some isopropyl rubbing alcohol and some Q-Tips (TM) and thoroughly clean the connectors of the Famicom game you’re converting. Also, give the connectors of the conversion board itself a good cleaning. Then plug your desired Famicom game’s board in where the Gyromite ROM board was. Be extra careful you have it in the right way: the former “front” of the Famicom board should be facing away from the front of the NES cartridge when you screw it back in. This is also a good time to test the assembly (if you have a top-loading NES) to make sure your game will work with the adapter and that everything is oriented the right way (hmm.. maybe we should have done this before making the label). I’ve accidentally put Famicom games in backwards before using the Gyromite converter and nothing blew up. So I guess that’s good news — if it doesn’t work, try flipping the board around.
 Once you have the boards (game board and converter board) mated together properly, you may or may not have to remove two plastic posts from the center of the NES cartridge case to get it to fit. It all depends on how big your Famicom game’s PC board is. My guess is that you’ll probably have to do it anyway, as I did in the case of using SMB3. Various methods could be applied for proper post removal. One nice technique that comes to mind is to cut them off with a rotary cutting tool (like a Dremel). You could also snip them off with heavy gauge wire-cutters. But I didn’t feel like doing either, so I simply lit a butane torch, heated a screwdriver blade and melted the post off in a nice, clean, flat, and dust-free fashion (Kids, please try this at home). Don’t try to break the posts off by force or you might leave a nice round hole in the face of your NES cartridge (I tried the same thing back in 1991, with the aforementioned undesired results).
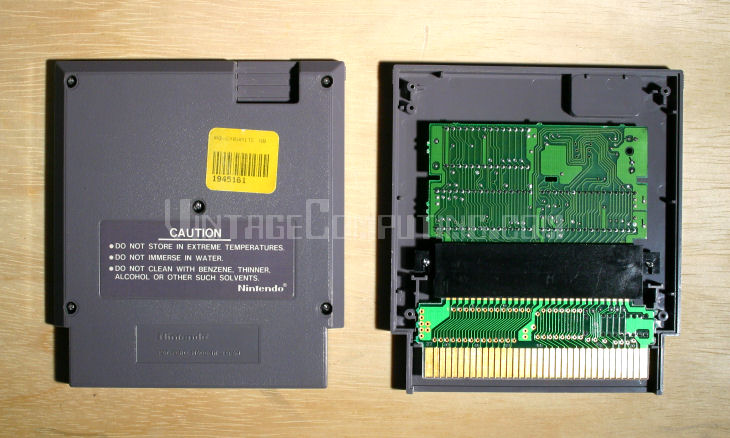
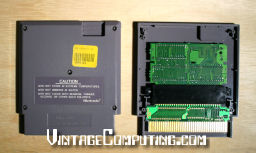
After plastic post removal (or PPR, as the pros call it) is successful, put your new game-converter assembly into the cartridge and screw it in with the original screws that once held the Gyromite assembly in place. Then put the back on the cartridge and screw that down as well, also with the original screws, EXCEPT — do not attempt to screw the middle/center screw in the back of the cartridge. Since you previously cut the receiving post for that screw off, it is no longer there, and in its place is a Famicom game board that could easily be damaged if you try to force a screw through the hole. Having done that successfully, the game is now in one piece and ready to play. Try it out and have fun! Let me know how it goes.
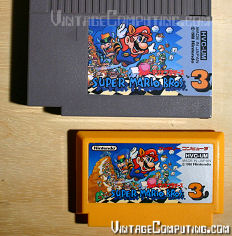
The final Super Mario Bros. 3 Japan cartridge for the NES! Sorry about all the watermarks on the images — if I didn’t do it, some hoodlum would be trying to sell an ultra-rare alternate SMB3 cartridge prototype on Ebay tomorrow.
Update (09/28/2006): To download the actual label graphic that I made for the Japanese version of Super Mario Bros. 3, click here.
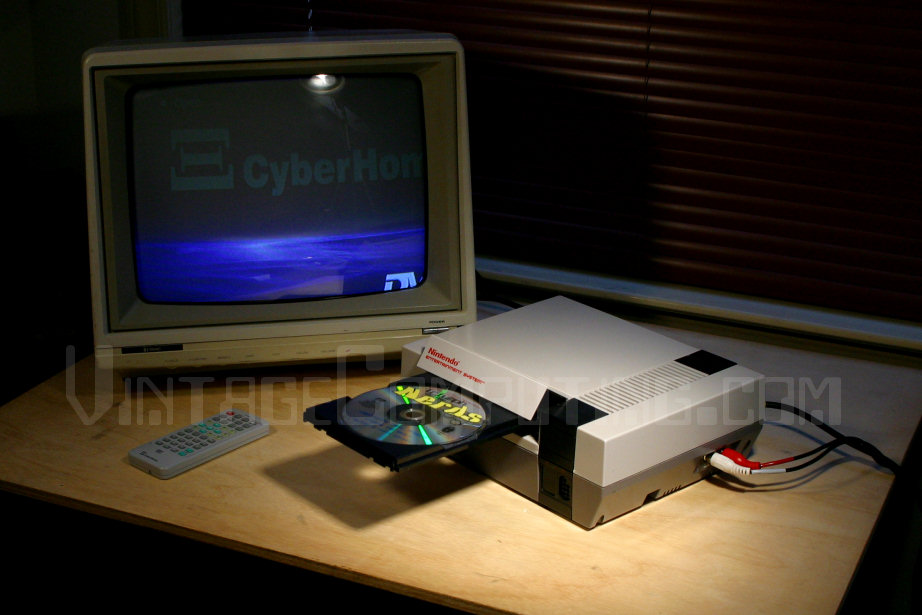
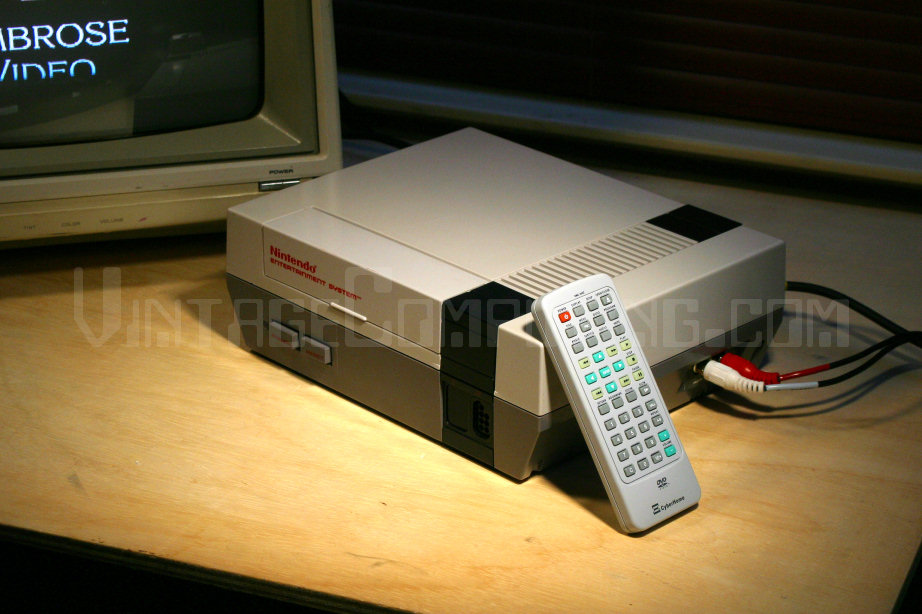
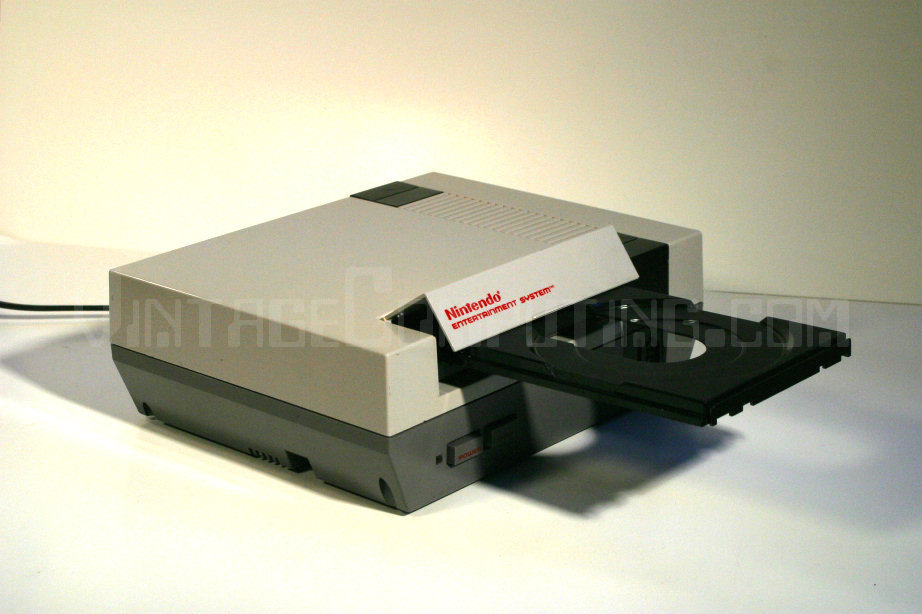
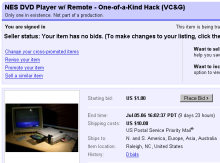 “Ok, RedWolf. Now you’ve gone and done it. Selling out to the Man!” That’s me. I’ve got a lot of clutter to clear and a lot of hungry kitten mouths to feed / fix, so I’m going to be auctioning a series of vintage computing and gaming related items in the coming weeks. The first item on the block is my very own custom NES DVD Player, which I lovingly crafted by hand and featured in an article on this very site back in early March. The article was very popular and I received a number of offers to purchase the unique player. I figured I’d never sell it, so I turned them down. How silly I was — here it is, for sale. I’m not planning on making any more of these, so this is your only chance to get the real thing. Tell all your friends and help me spread the word. It’s for a good cause, after all…feline population control. Thanks!
 [ Hacksterpiece Theatre is a regular column devoted to fun, odd, and interesting retro game hacks. ]
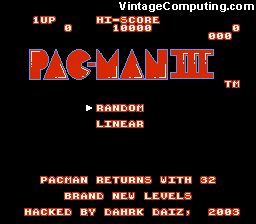 Pac-Man III is an inventive hack of the NES version of Ms. Pac-Man that adds new boards, new colors, new features, and new eyeballs.
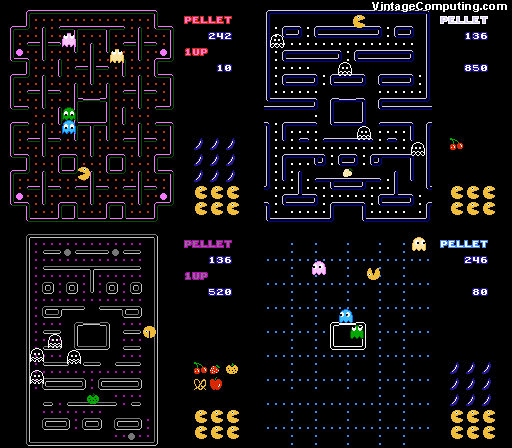
 Honestly, this next hack is nothing too special, but I thought I’d include it for completeness.
 Back in March on Vintage Computing and Gaming, I profiled what I called “
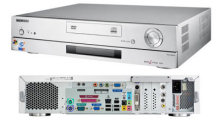 I have always wanted to build something that I like to call a “Universal Game System” (UGS). You could also call it the “ultimate game system,” since it would play all games for every game system ever released. Well, theoretically it could — with a powerful enough processor and the right emulators. That’s why I call it “universal.” But for now I’ll set my sights lower and stop at the N64 generation. The UGS itself would have a simple interface to launch every game, would have ports for every type of controller for each system (or at least a select few that could be used on most games), it would hook up to a TV, and it would require nothing more than a game controller to select the games and operate the interface. You, the user, would provide the ROMs and controllers, and the UGS would do the rest. I suppose this would be kinda like a making a “
 It is my goal to one day build one of these, but the requisite software is not quite together yet. I’m not aware of all the latest and greatest in the emulator scene, but maybe something that would help me build a UGS is in the works. I know about
 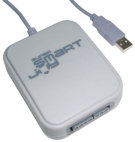 But the software is only half the battle. I also need a small, compact, quiet, and cool PC case that can hold the right cards for the I/O required, while also being able to hold a powerful enough processor to do the job (processor-generated heat is the main factor in dictating noise level and case size). Inside said box would be a versatile computer video card with an excellent composite or S-Video analog TV-out that looks good on regular old TVs. I’ve tried a few cards so far, but the video is always lackluster, and you have to reference a VGA monitor on the side to actually read what you’re doing (to select the games to play, etc.). As far as interfaces go, I plan on building a large controller interface box that has ten or more types of classic system controller ports that would all hook up to a USB connection, similar to
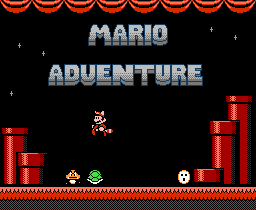


 Here’s a quick gaming tip that especially applies to those of you with shoddy power companies. For years, it seemed my house would have power flashes at least a couple times a month. There was something about the power on my block that was especially unreliable (nearby transformers seemed to blow all the time), and it got really annoying. Naturally, I got
  VC&G: What’s your favorite new feature of Mario Adventure? Also, what’s your favorite world in the game?
 VC&G: Have you done any previous game hacking projects? If so, tell us about them.