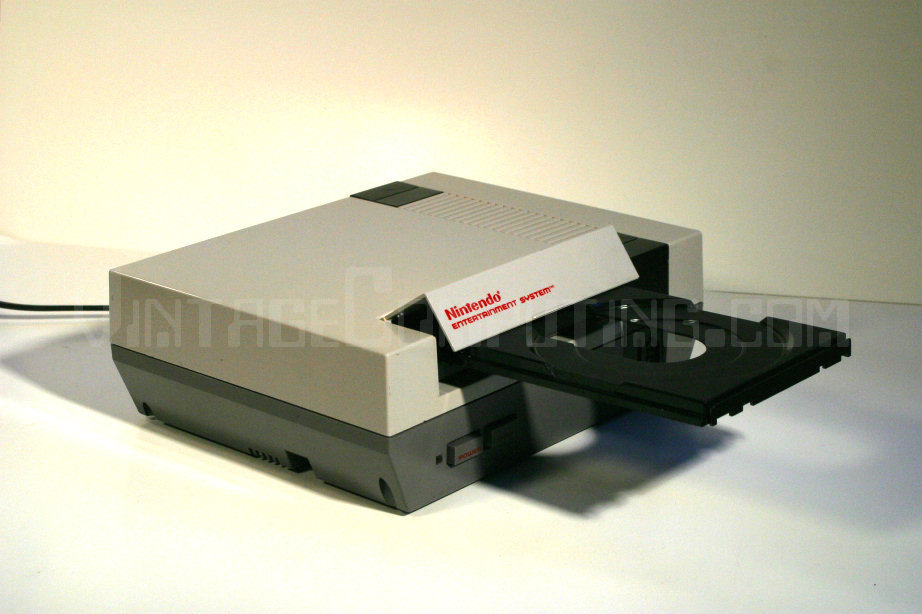
I know; the title is not really saying a lot. Who needs a DVD player in their NES? Well, nobody really. But it sure is fun to see what you can cram inside a NES case and make it still look as much like an authentic NES as possible. It was only after I completed this hack that I bothered to see if anyone had done something similar before. It turns out that somebody has, but in my totally biased opinion, not nearly as well.
Despite my pride in my creation and the “ultimate” in the article title (I like to exaggerate sometimes for dramatic effect), it doesn’t mean that a NES DVD player design couldn’t be improved. I am particularly proud of my unit’s exterior — how the NES’ look and feel was preserved without drastic interruption. However, the internals could have probably been pulled off with a lot more elegance if one had better tools, better materials, and more experience in doing this sort of thing. All that being said, here are some nice features of my particular NES DVD Player:
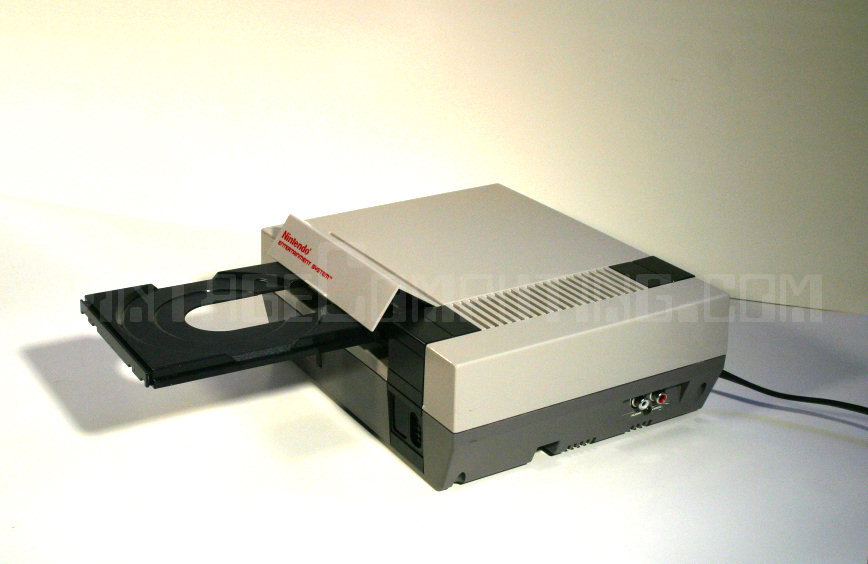
- NES Power Button turns DVD Power on/off.
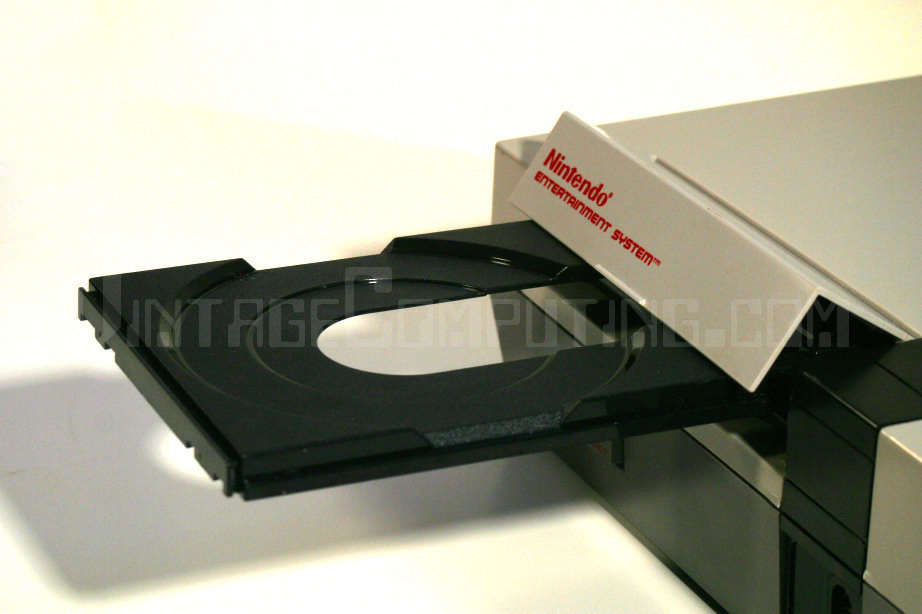
- NES Reset Button ejects DVD tray.
- Fully functional remote control…control.
- Infrared receiver (for remote control) inconspicuously placed in first-player controller port area.
- Upon ejecting or retracting the DVD tray, the NES cartridge slot door opens/closes automatically.
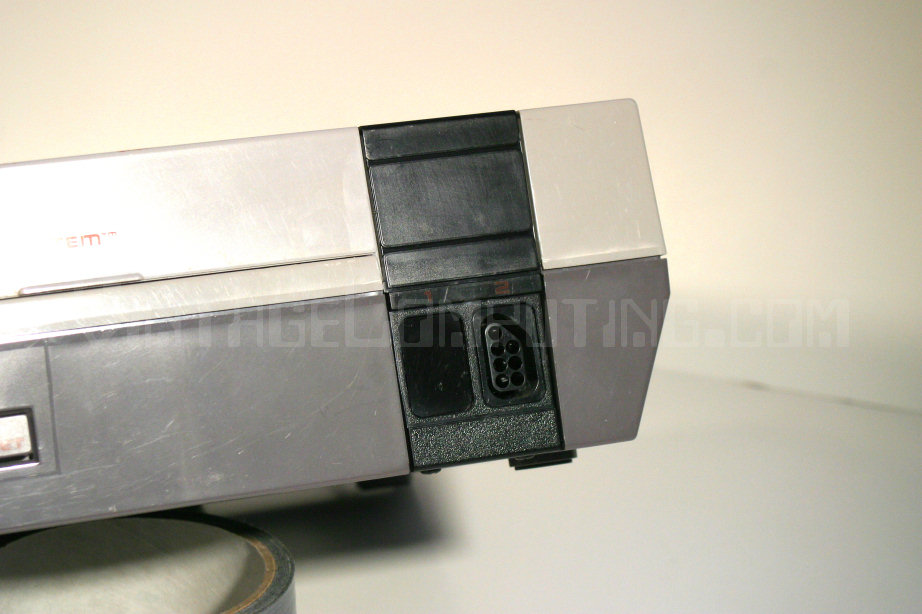
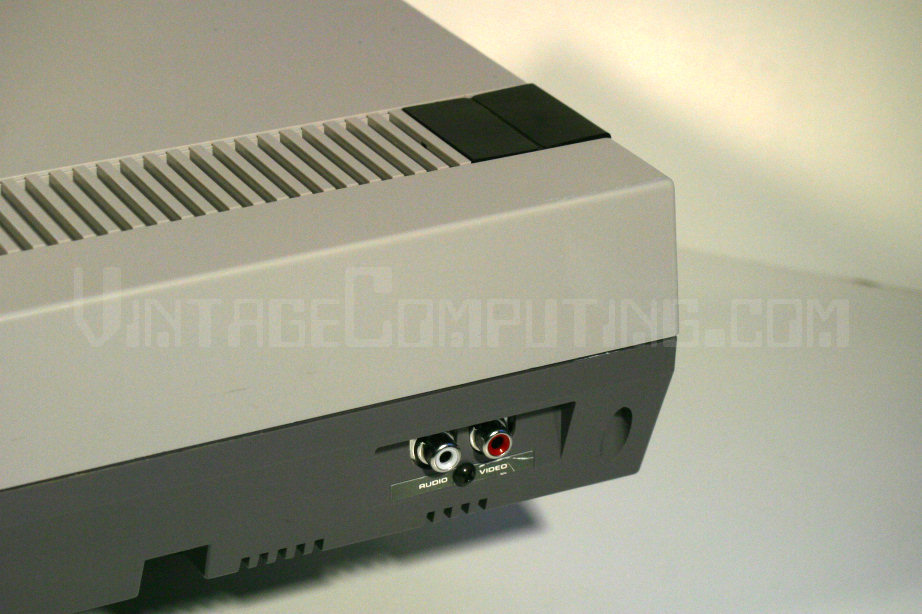
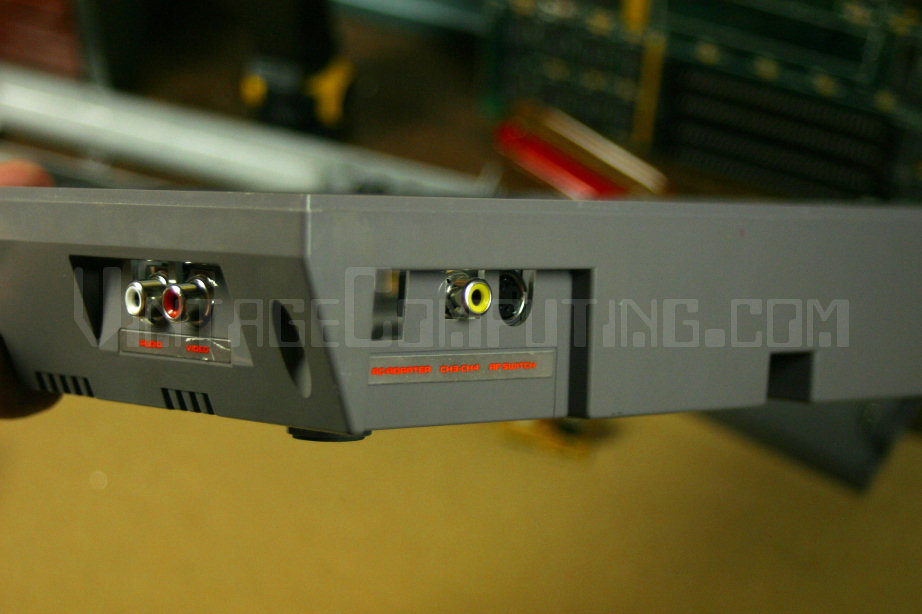
- Stereo RCA audio left and right output jacks positioned on right side of unit where former NES composite video and mono audio RCA jacks were.
- RCA Composite video output jack positioned where former NES RF output was.
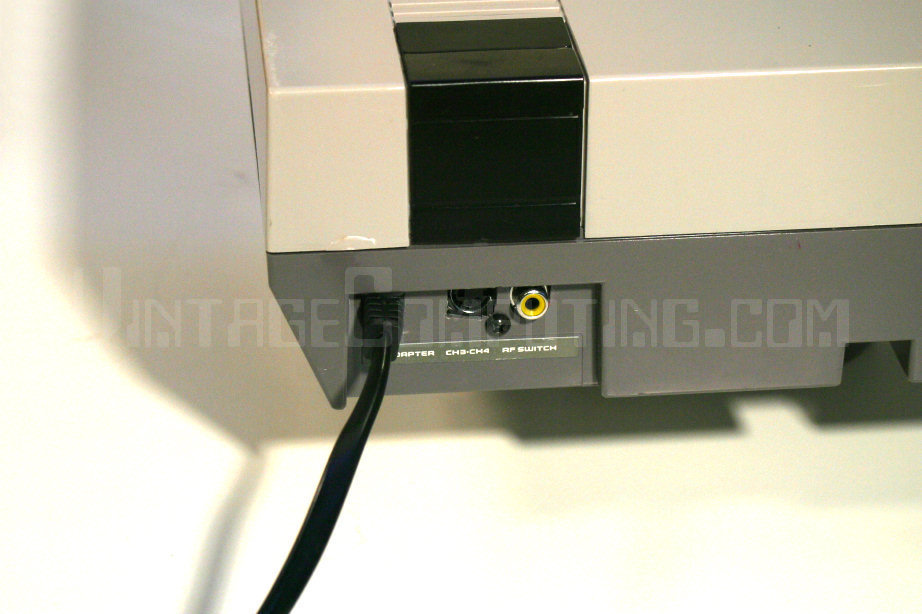
- Optional S-Video Output jack where NES channel 3-4 switch was.
- AC Power cord firmly attached where NES AC Power Adapter used to plug in.
- Yes, it really plays DVDs.
Now with all of that out of the way, sit down, relax, and I’ll tell you the story of how I made this beast.
Prepare for lots of pictures after the break…
Prologue: Breakfast of Champions
Monday, February 27th, 2006 – 11:00 AM
 It all started at the breakfast table. It seems like everybody is turning a NES into a something else these days, and I wanted to take a crack at it. I pulled out a NES, plopped it on the table and brainstormed. Like most of my best ideas these days…they come from my fiance.
Up to that point I was trying to figure out how to turn a “toaster” NES into a real toaster. Of course, putting Nichrome heating elements inside a plastic case with less than one inch of clearance on one side is not a particularly good idea. I then thought about doing it anyway — building a NES toaster that would toast bread only once, shortly before dramatically melting into a puddle of NES-colored goo. I would video tape the entire process, put it on the Net and become famous for being a complete retard.
So there I was, staring like a zombie at a NES, lost in worlds of fame unknown, when my fiance suggested that I turn it into a DVD player. “Wow, how simple,” I thought, snapping out of my trance. I even had a cheap, crappy, small DVD player sitting around that I could use! So I grabbed the DVD player and an old, nicked-up NES that was already apart and got to work. I wouldn’t see my significant other again until about 2 am the next morning — I had twelve straight hours of intense, exacting work ahead of me.
Most hacker stories start something like this: “I grabbed a bag of [popular junk food] (Cool Ranch Doritos) and a twelve-pack of [ super-caffeinated soft drink] (Mountain Dew) and got to work.” But I grabbed nothing, for I would not be eating food that day. No; food is for pansies. I would be eating pure electrons.

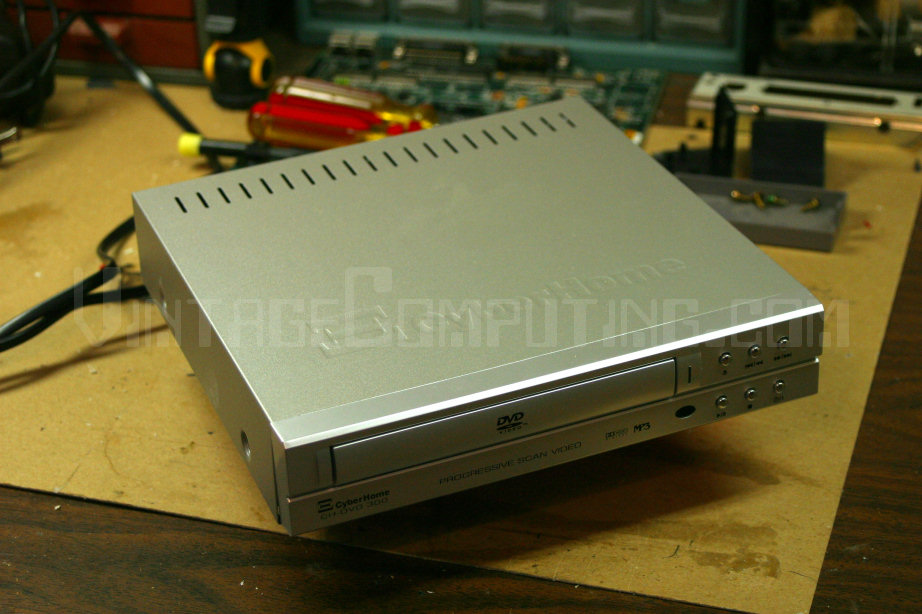
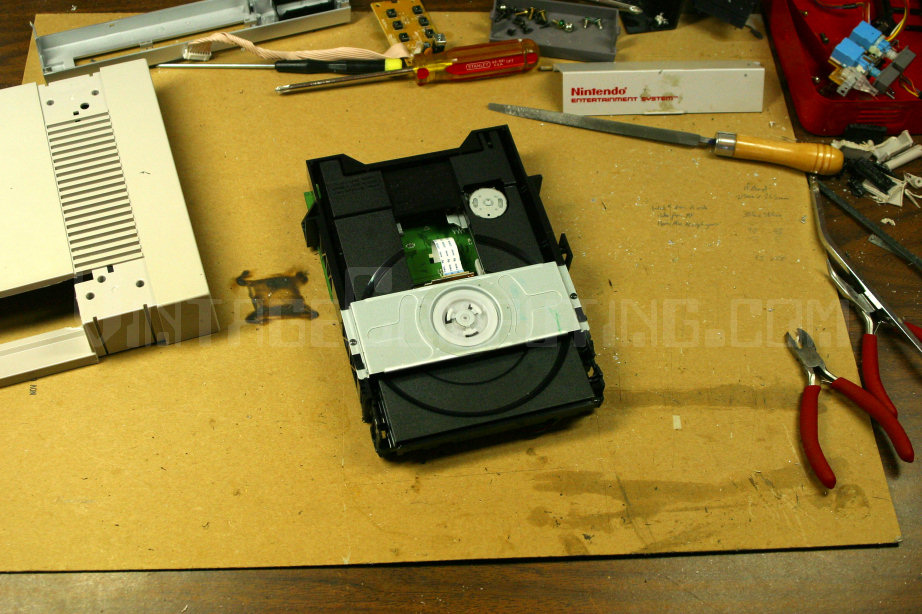
Here is the original DVD player before it was skinned alive and put into another machine’s body against its will. Ever seen
Face/Off? Well, this hack is kinda like that except there are thankfully no faces involved, or else I would be having crazy nightmares for the rest of my life.
All drama aside, this “CyberHome CH-DVD 300” DVD player was purchased by myself at a local Target sometime last year for about $40 US (Thank you, China). Honestly, it’s a pretty bad DVD player. It seems to have trouble playing certain discs, and yet many discs work perfectly. But somehow for $40 you can kinda forgive the ten year-old who designed it. The best thing about it (aside from cost) is that it’s small. This feature made it an ideal choice for NESization.
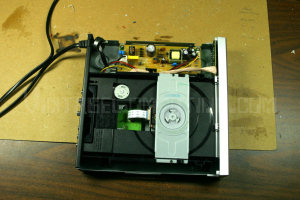
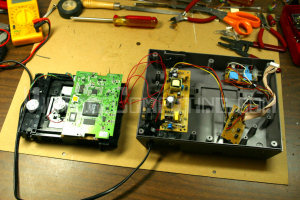
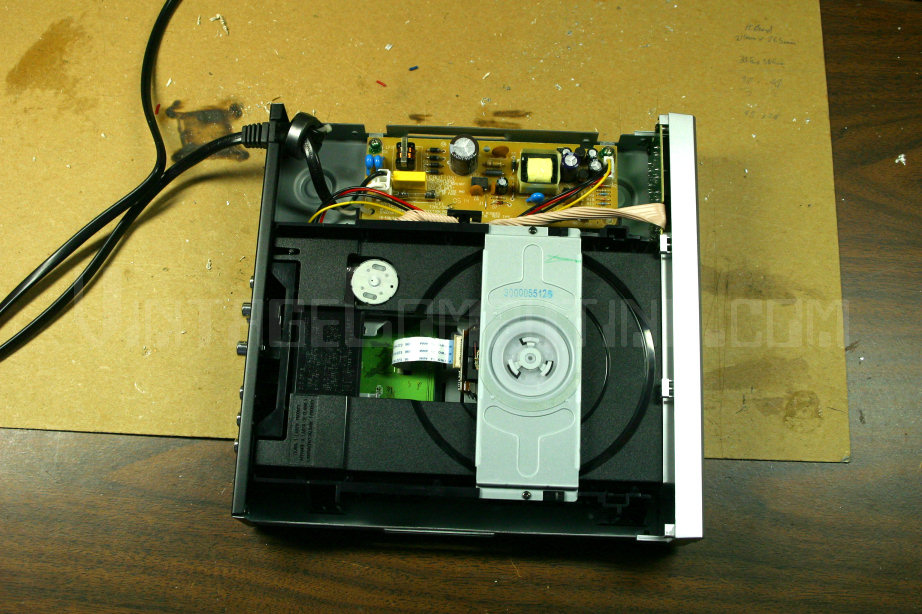
It couldn’t have been more simple: discrete modules separated by function with lots of cable length between each assembly — and there are only three of them. Perfect for hacking!

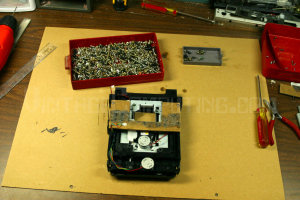
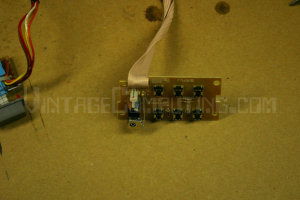
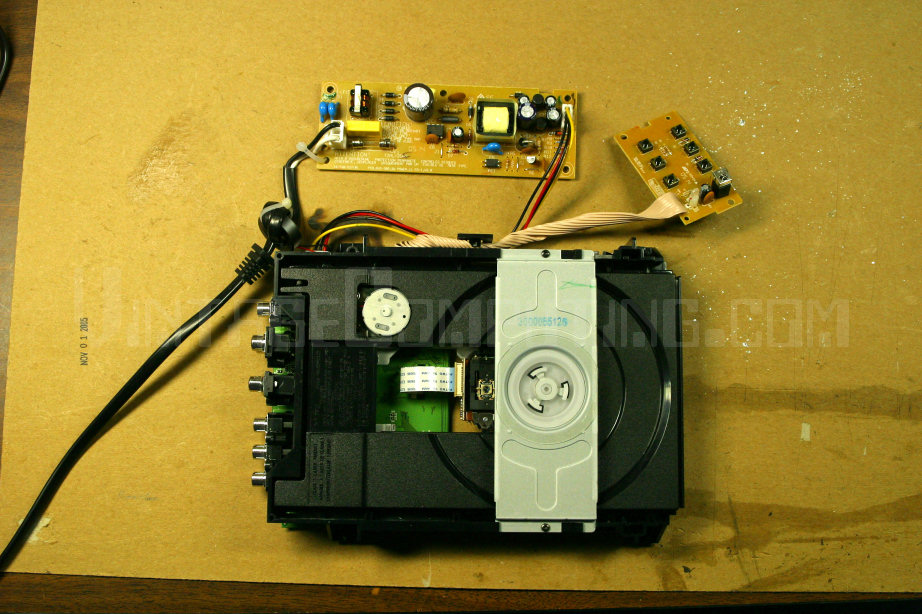
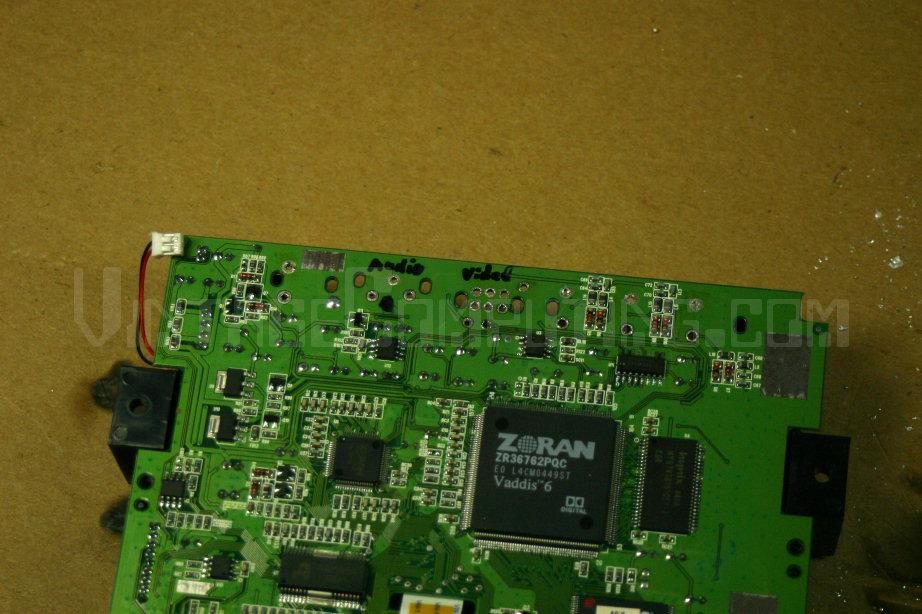
Here you can see the guts of the DVD player taken out of the case. The top board is the power supply that takes AC from the wall and turns it into yummy DC that the player can use. The upper right board is the button/control assembly with all the play/stop/eject buttons, the power LED, and the IR receiver for the remote control. And the thing on the bottom is the DVD drive assembly, which includes all audio and video output connectors mounted on a logic board for the drive, which, in turn, is mounted on the disc reading and tray assembly.
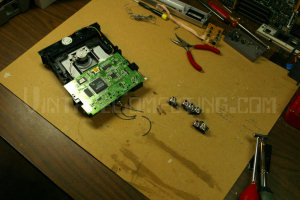
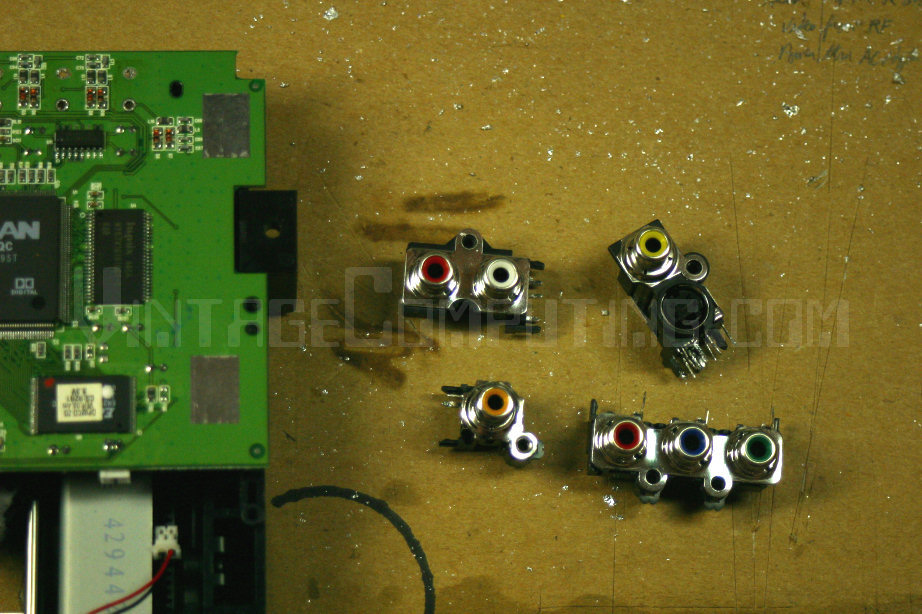
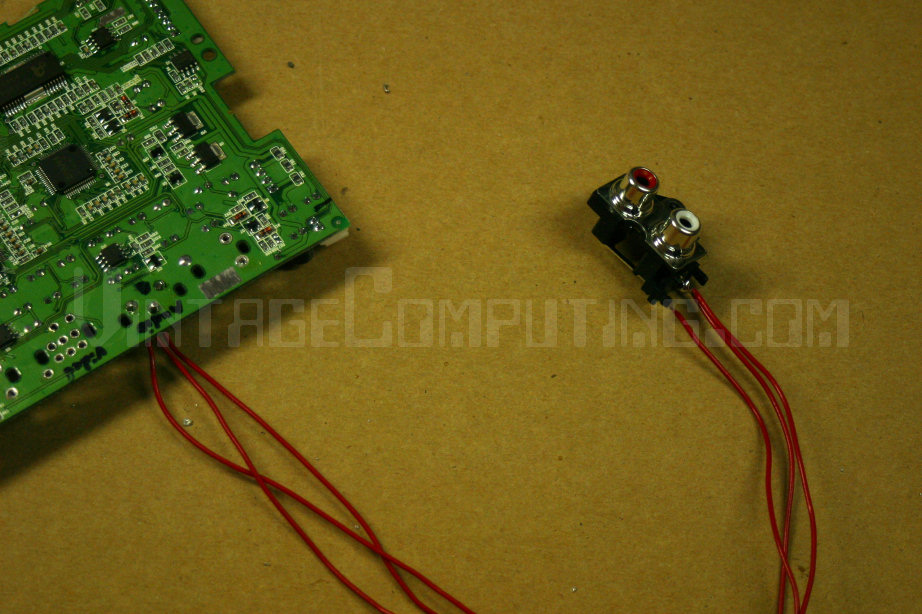
After removing the stinky entrails from the DVD player carcass, I came across the first problem. The DVD drive assembly was too long to fit in the NES unmodified by a couple inches. The first thing I did to shorten it was to de-solder the AV connectors that were mounted on the logic board. The same connectors would also come in handy later, as you’ll see.
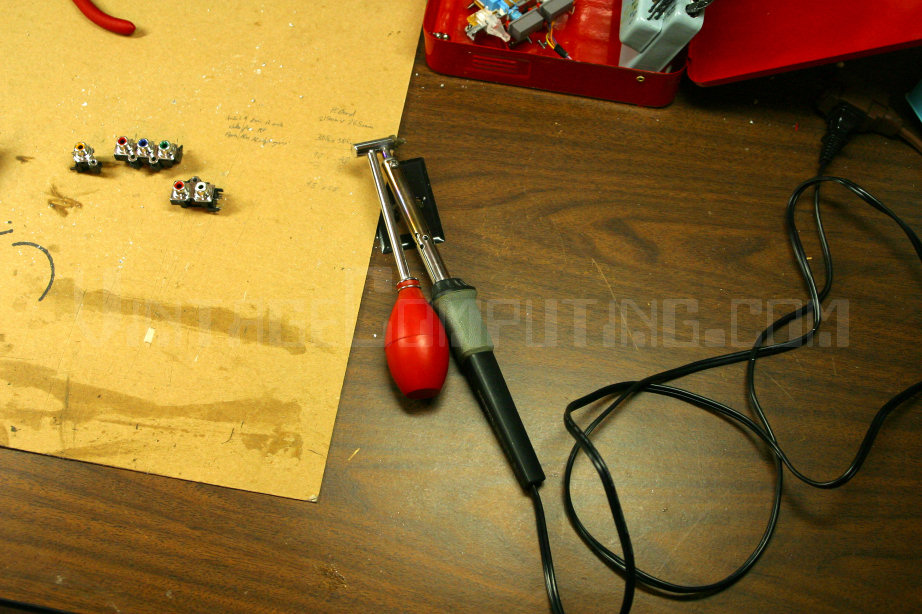
People come up to me on the street and ask, “RedWolf, you’re so good at de-soldering things. What’s your secret?” Well, little Timmy, I’ll tell you. I have a special weapon in my things-that-burn-other-things arsenal that I bought at Radio Shack about three years ago. It’s called a “de-soldering iron” and I highly recommend it to anyone who tinkers with electronics. Strangely enough, you’d be surprised at the number of seasoned electronic engineers who’ve never seen, heard of, or used one of these. Its operation is quite simple and effective: you plug it in, it heats up, you squeeze the bulb and hold it, then place the hot hollow heated point of the iron on the joint you want to de-solder. Wait a moment for all the solder in the joint to melt. Make sure you’ve got the joint hole covered up as much as possible, then release the bulb. This sucks up the solder. Then point it at somebody you don’t like and squeeze it again to burn them horribly with tiny bits of molten solder your desk, away from important stuff, and blow the solder out. Usually it can get the solder out cleanly so that the component you’re de-soldering just falls out. If you can’t get it all out in one suck, then add more solder (believe it or not) until you have a glob that definitely covers the gaps around the joint and the hollow de-soldering tip. Then suck it all up, spit it out, and you’ve got it. Now go brush your teeth.
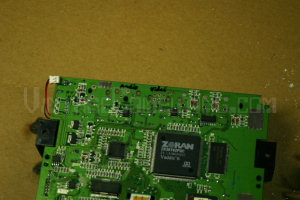
A closeup of the drive logic board with the connectors removed. I’ve labeled the contacts for the connectors I’ll be using again.

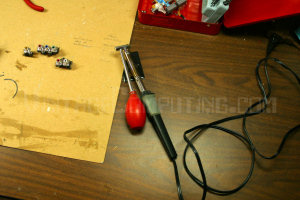
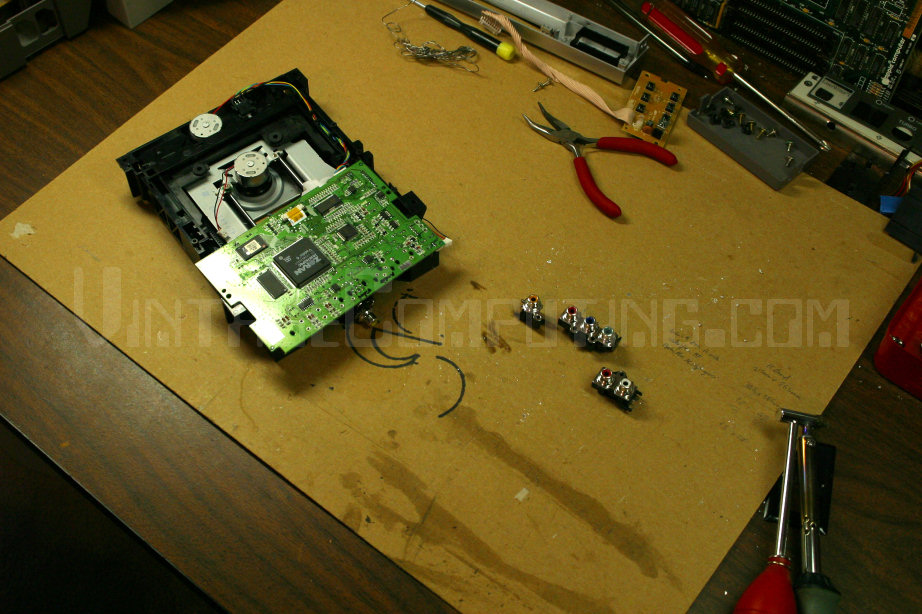
Here are the connectors I de-soldered. I saved the analog audio-out and the analog video-out connectors and gave the rest to my pet robot to play with.

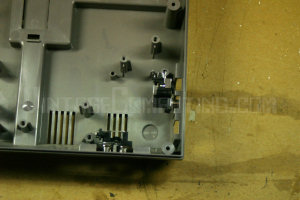
Here’s a big step I won’t be covering in my overview — gutting the NES case. In this particular case (pun intended?), I had a NES that was already apart. In fact, it was the first NES I ever owned and also the first one I ever disassembled (back in 1992 or so). Somewhere along the line I lost the screws and, well, it stayed apart. The NES itself was a bit banged up, but it made the perfect guinea pig for a project that could have, for all I knew at the time, gone horribly wrong.
In this picture you’ll notice that I’ve removed everything possible from the case, leaving only the top and the bottom. I did this because I intended to clean it thoroughly and also so I wouldn’t mess up any other pieces while I was modifying the case.
Here you can see that I am working out where I will eventually put the AV connectors. I used some mounting putty to stick them in place temporarily to get a feel for it. As it turned out, the connectors that came with the DVD player were perfect for use in the NES.
By the way, I am required by law to begin every picture caption with the word “here.”

Here’s another view of the mocked-up connectors. Eventually, the S-Video out and the composite video out connector positions would be switched.
Somewhere after this step I washed the plastic case in my dishwasher (works great, by the way). The only casualty was the red print on the “audio” and “video” labels in the back. It washed off, but luckily white was left underneath so you can still read them. I suppose I could have covered them somehow, but I was in a hurry.
Those big “VintageComputing.com” watermarks on the images are annoying, aren’t they? It’s a shame the Net’s come to this, but without them you’d find my images spread everywhere across the net, eventually somehow being integrated into porn. My next book title: The Internet: All Roads Lead to Porn.
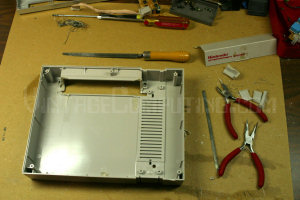
After cleaning the NES case, I did some heavy modifications to the inside of the top part of the case. My tools of choice were a soldering iron with a bad tip installed that I use for melting plastics (or anything other than solder), a set of metal files (to flatten, smooth, and shape), a pair of light-gauge wire cutters to trim small pieces, and a small bolt cutter to clip thicker plastic parts with ease.
I’ll spare you the safety disclaimers, except for this: if you melt any plastics, open a window and make sure you have adequate ventilation in your work area (I can hardly think of anything worse to breathe than vaporized plastic). We already have few enough hardware hackers as it is on this earth — no need to tempt fate and reduce the nerd count. Oh yeah, and while I’m at it, don’t attempt to use a handgun to blast off bits of plastic from the case. Use a shotgun instead — it gets the job done quicker.

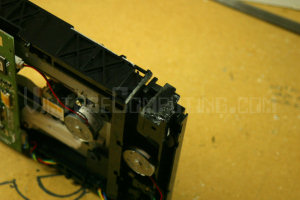
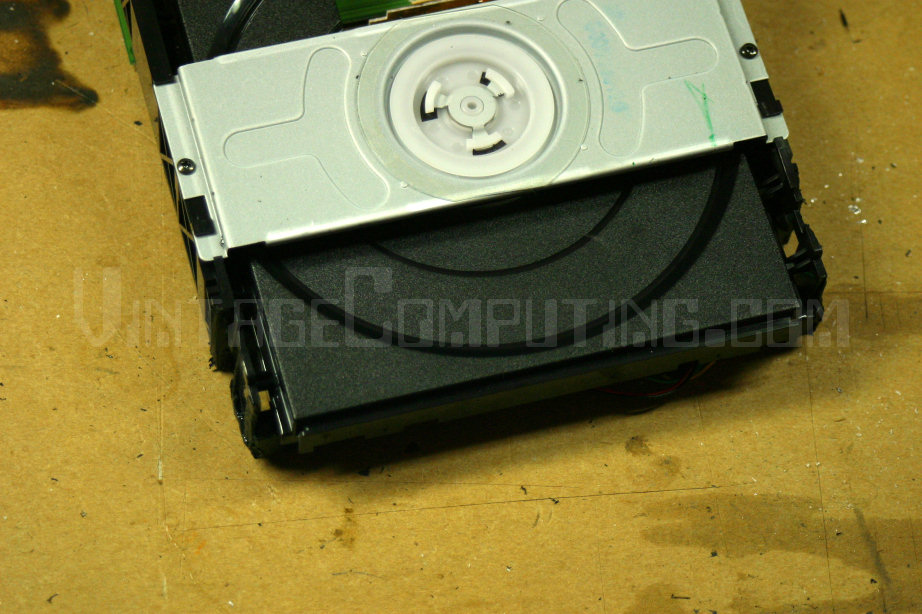
The NES case wasn’t the only plastic that I had to melt and chop away. Here you can see the front of the drive assembly that I had to thin out, width-wise, to get it to fit into the widened NES cartridge slot.

Here you can see the full drive before I viciously chopped off the back of it.
The black burn mark to the left of the drive (the one that looks like some kind of Blair Witch symbol) is all that’s left of a matchstick house gone horribly wrong. True story.
And here we have a naked picture of your mom holding a banana. Notice the intricate implied tension inherent in this image.
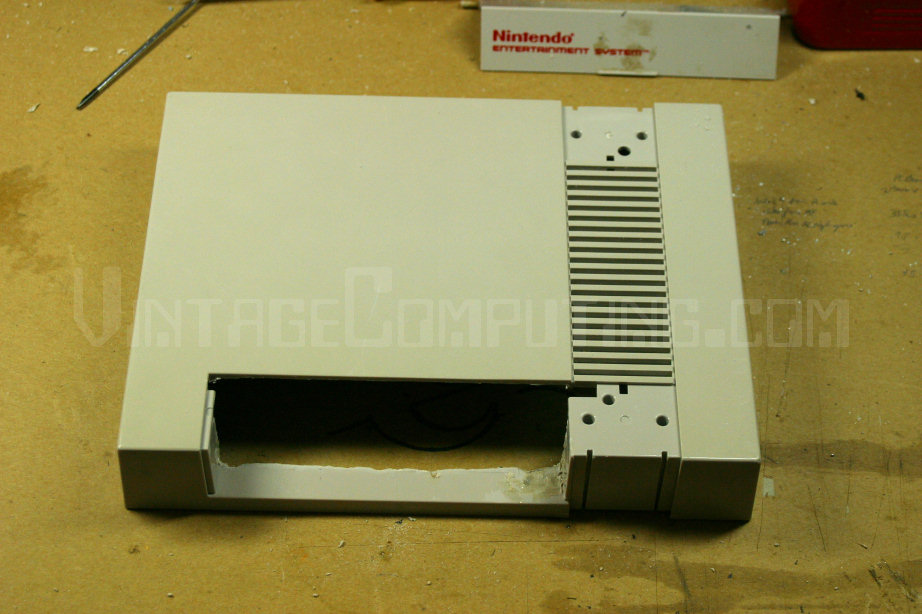
At last! Something interesting again. Here’s the top of the case — you can see how I had to drastically widen the cartridge slot so that the front of the drive would fit through it. I did it carefully so that none of the chopped parts would be visible once everything was put back together (and it would look like regular, non-lobotomized NES).

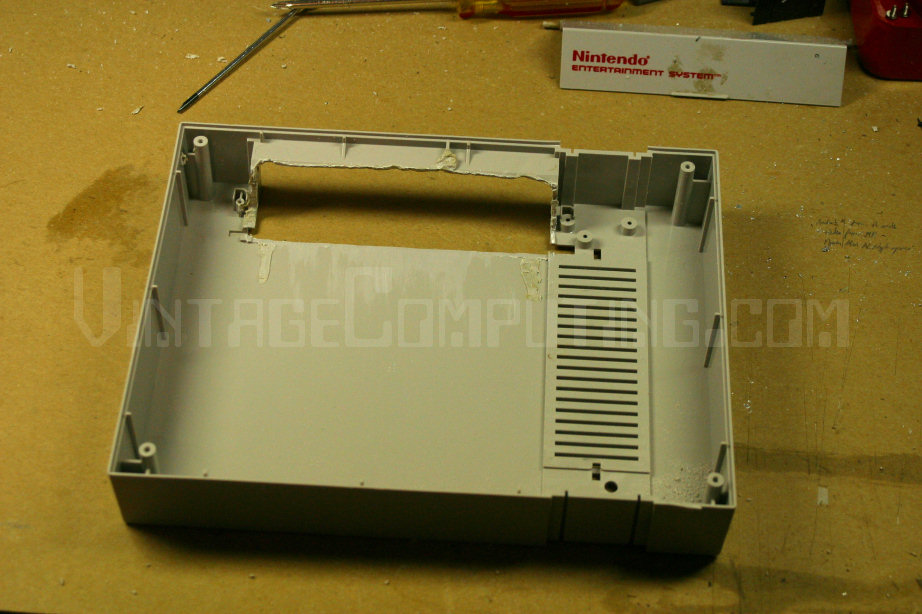
Here’s an underside view of the modified NES case top piece. Looks messy on the inside, but nobody will ever see it once it’s all together. (Except, perhaps, Superman…) In the background you can see the dirty NES case lid anxiously awaiting its reunion with the rest of the case after ten long years of separation. I can’t wait.
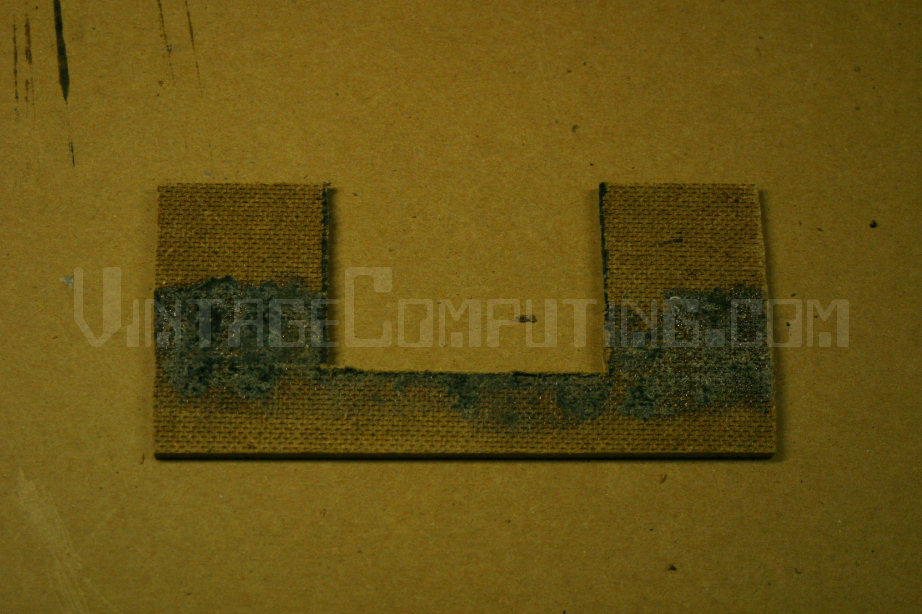
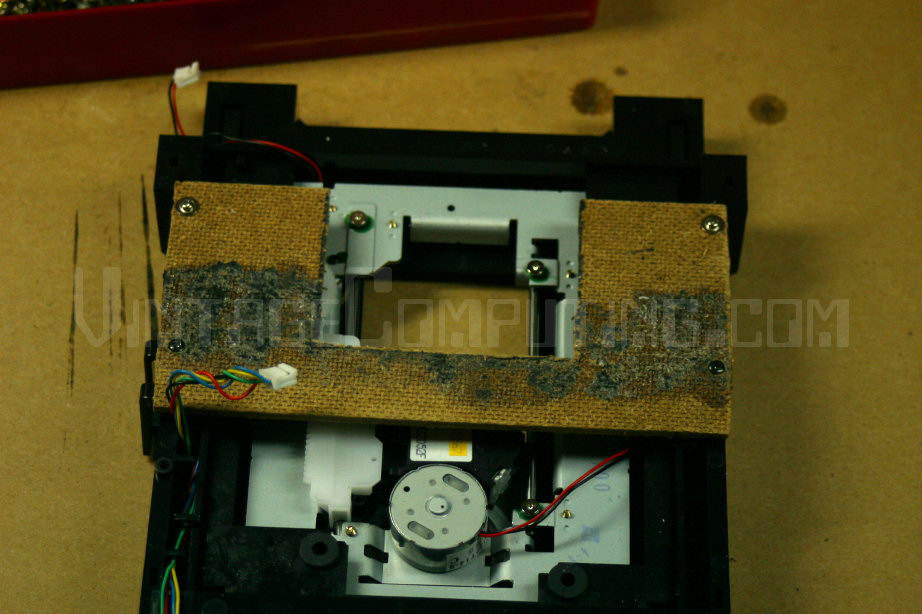
Ok, now back to the drive assembly. Even after shortening it a bit, it was still too long to fit in the NES case. So I had to chop off some useless plastic in the back. The only problem was that the logic board was mounted directly underneath that “useless” plastic section, and thus had to be moved and remounted elsewhere. I found a spot for the board about an inch toward the front of the assembly where the disc read-head ribbon cable could still reach any position it needed to go while reading a disc. There was no easy way to directly mount the board there, so I dug through my scrap box and pulled out a piece of
Masonite. I measured and cut the Masonite to fit between the board and the plastic drive frame, then drilled holes so I could screw the Masonite into the plastic frame, and in turn, screw the logic board into the Masonite.
Everybody’s got a screw collection, right? One of the things I love to do with any hack or mod is to use whatever parts I already have available, most of which come from old junk that I took apart long ago. It can make for a pretty uneven project, but it ultimately seems more satisfying somehow. Here, I was finding the right screws to fit in the screw holes in the plastic drive frame so I could attach the Masonite mounting board. Obviously, I found some…the Masonite is screwed firmly in place.

Here’s a closeup of my Masonite mounting board (explained above) attached to the plastic drive assembly frame. The black stuff on the Masonite is leftover adhesive and foam from its previous life as a partition in a Gamecube travel case. Oh how the mighty have fallen.

The chopping continues. With the Masonite attached and the logic board out of the way (and still off to the side as of this picture), I sawed off about an inch of plastic from the back of the drive assembly. It included superfluous plastic from both the drive frame and the disc tray. After this, I tested the drive and it still worked (including eject and loading), so on with the show!
By the way, if you try this at home, take care not to accidentally lick the focusing lens on the DVD drive’s read head (I hear it can mess things up).
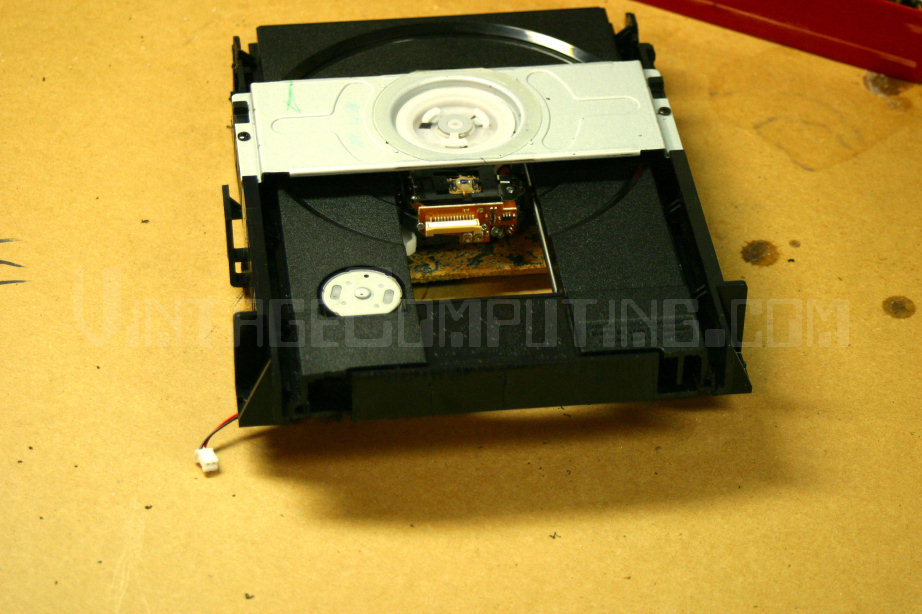
Sweet Victoly! I finally got the drive to fit in the spot I wanted in the case. I still had not remounted the drive’s logic board, and you’ll see why in a minute.

Before I remounted the logic board, I needed to do some soldering. More specifically, there was still the issue of the AV Connectors to take care of. I cut some lengths of wire, soldered them to the board where the connectors originally were, then carefully soldered the other ends of the wires to the tips of the connectors’ leads (that originally were soldered directly in the board). I’d never tried this before, and let me tell you: it’s a pain in the ass. But after soldering, the joints between the wire and the leads held up surprisingly well under stress. Still, one must be careful with joints such as this, as they are usually liable to break at any time if you so much as sneeze on them.

I completed extending both the audio and video connectors so they can be mounted elsewhere in the NES case. At this point I could have added about six extra wires from the logic board to the S-video section of the compound S-Video and RCA video connector in order to preserve S-Video output from the DVD player. But I didn’t want to go completely insane in the middle of the project, and I only own one S-Video cable to my name, so I just stuck with the two-pin composite connection. Still, it’s nice to know that the option for S-Video output is there if I am ever willing to risk complete insanity by attempting such a soldering feat.

Back to sawing! At this point I was attempting to figure out where I would put the remote control infrared (IR) receiver. I intended to de-solder it and extend it like I did the AV connectors, but it turned out to be unnecessary, as you will soon see. Anyway, I thought about sticking the IR receiver in one of the NES controller pin holes, hence the brutal sawing of the controller port connector. I decided that even if I did stick the IR receiver in there, the receiver’s receptive ability at anything other than right-angles to the front of the unit would be severely hampered, if not eliminated.
I ultimately decided that I would skip all that bunk and just put the receiver behind a semi-opaque piece of plastic that would fill the “Player 1” controller port. This modified port connector did come in handy though, eventually filling the area for controller port 2.
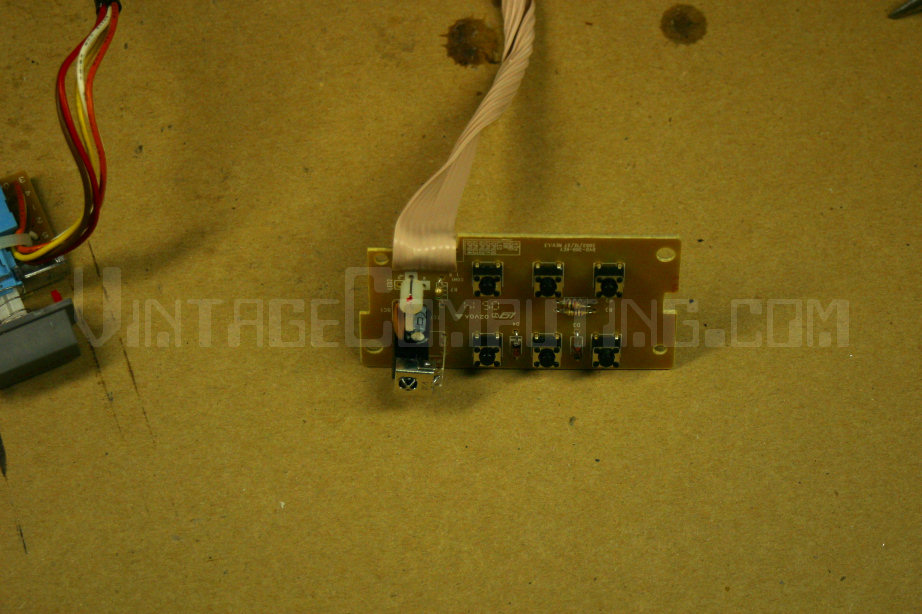
Before you lies a close-up picture of the control assembly. It’s so simple that even electronics novices such as myself can understand its function and design, almost as if they designed this thing to some day be hacked and featured on
Vintage Computing and Gaming. Creepy.
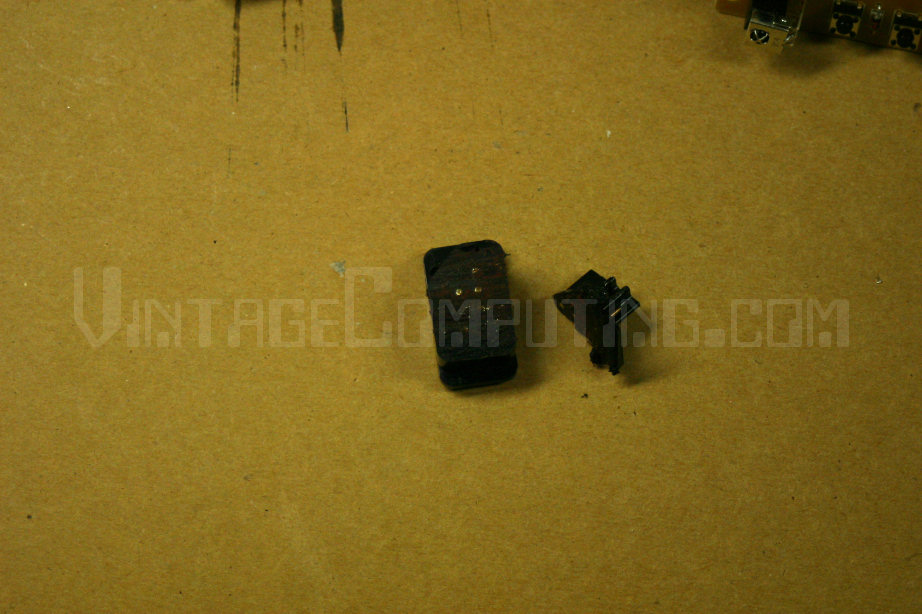
Soldered on this assembly are the two-color power indicator LED, the IR receiver, and six tiny buttons. The top left one is the eject button, and the bottom right one is the power button. Those were the only two buttons I would be needing to rewire, so I de-soldered them along with the LED, but left the IR receiver in place.
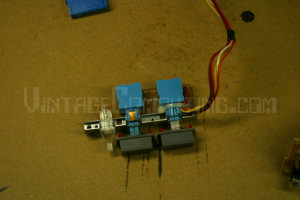
Here’s the NES’s original Power/Reset Switch and LED assembly close up. We’ll be needing it soon.

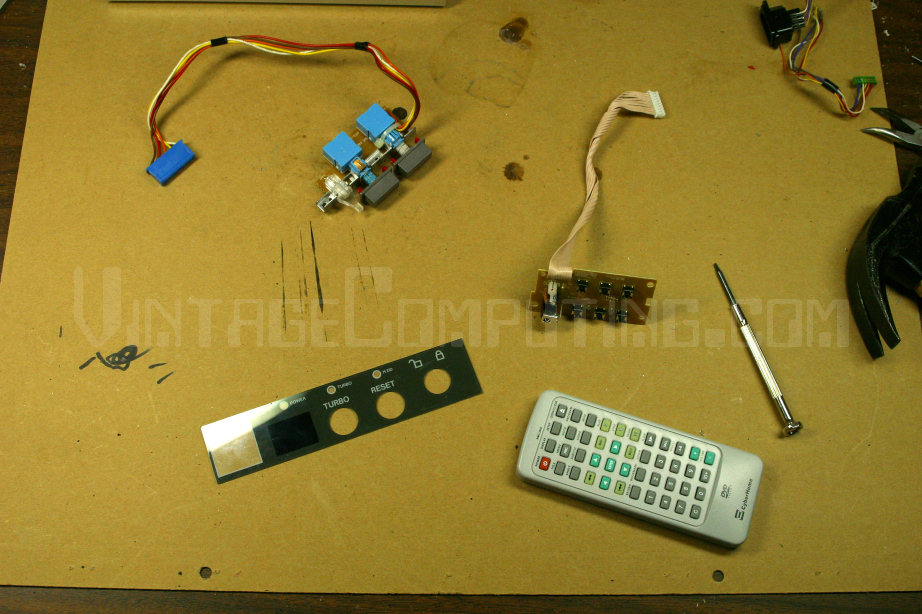
This picture is relatively useless aside from the fact that it contains an image of the old plastic PC bezel that I chopped up, fit in the space where controller port 1 was, and used to cover the IR receiver. More recycling at work — that bezel once covered the “megahertz speed” LED readout (which usually read “16”) on my family’s first ever 386 PC-compatible. I tossed its case a few years ago after it had been used with many different motherboards, but its bezel will now live on in a different form. Also pictured is the DVD player’s remote control and a weird mini-Torx screwdriver that literally appeared in my toolbox one day when I wasn’t looking.
This seemingly redundant picture contains a nugget of information vital to the successful completion of this project.
The NES power button is a “latching” push-button switch by default. That is, you push it in and it locks, completing the circuit as long as it’s latched in the “in” position. You push it again and it pops back out, breaking the circuit. The DVD player power button uses a “momentary” push-button switch. That is, you push it in and the circuit is completed only while you hold it down, and when released it pops back out again, breaking the circuit. The “Reset” button on the NES is a momentary switch as well. To turn the NES Power switch into a momentary switch, I ripped off a small metal cover on the top of the switch and pulled out a tiny piece of metal that looks like a staple. That “staple” controlled the latching mechanism, and with it removed, it no longer latches and is now a momentary switch. This step must be done for the switch to work with the DVD player correctly.
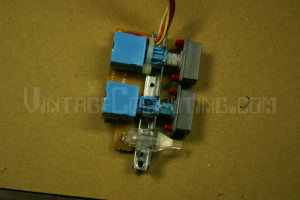
In addition to the NES’s front panel switches, I wired up the NES’s power LED to work as well. I simply removed the old DVD player’s two-color power LED (It showed red for off, green for on) and soldered an extension to the NES LED in its place. I used the pads for the “green” part of the LED on the control board so that the NES’s LED would only turn on…when the unit was on.
Also, you can see that all the wiring for the switch/LED assembly is complete. It looks a little sloppy because I made a couple mistakes that I had to fix in the process, but it now works perfectly.

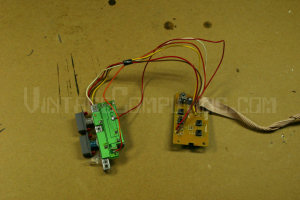
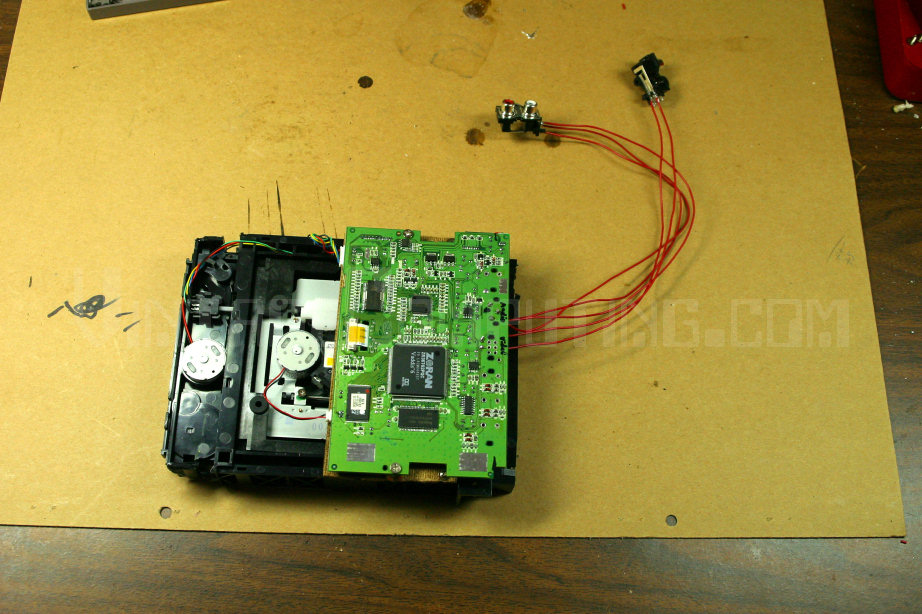
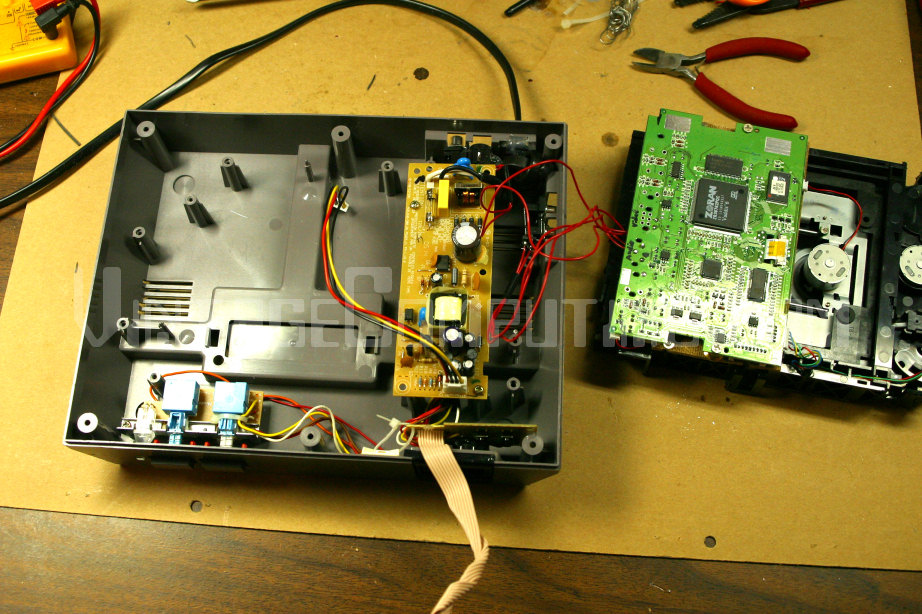
With the NES switch/LED assembly mounted back in its rightful position, I tested possible positions for the DVD control board.
Somewhere before this point I put everything back together (loose on the floor) and made sure it all still worked. Luckily, it did, so I set out fitting everything in the case.
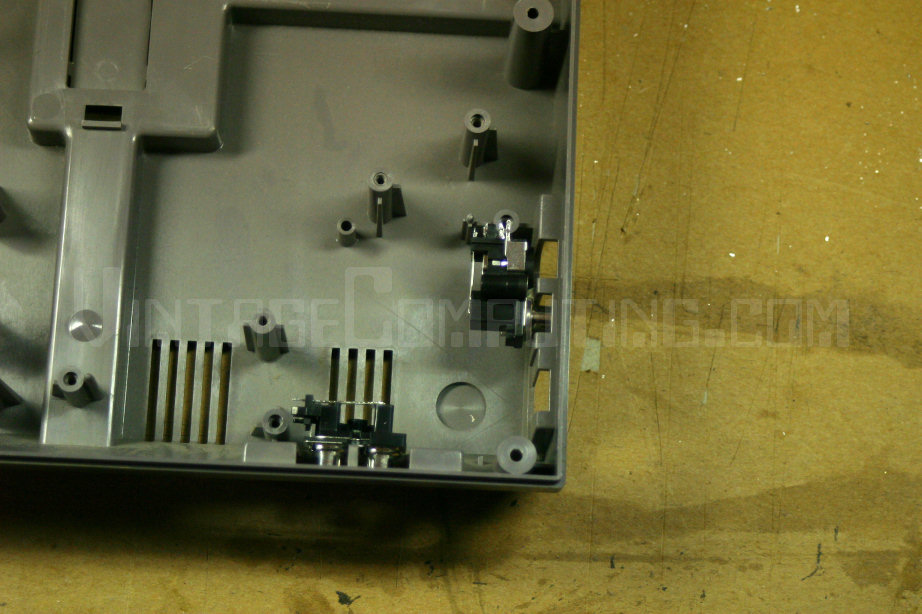
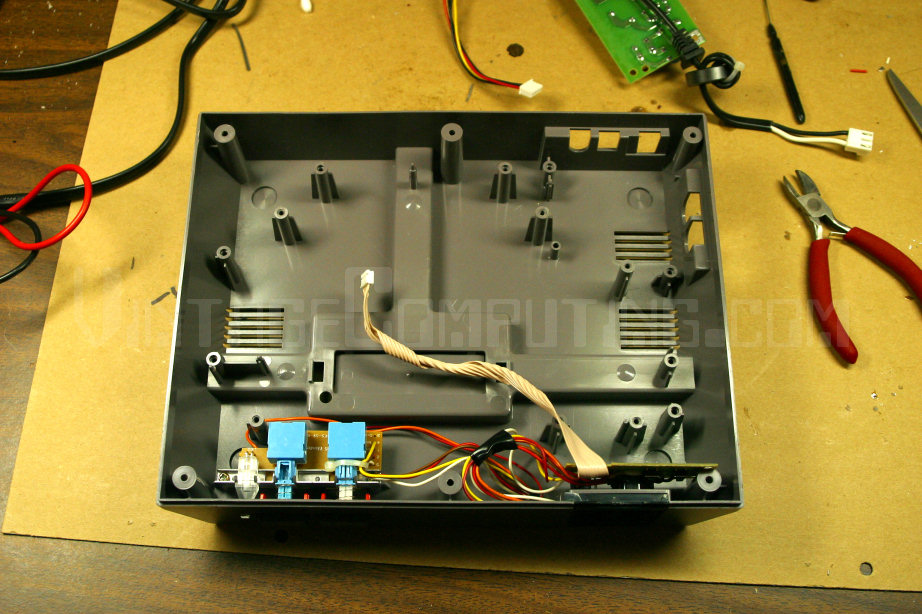
In this picture the AV connectors are now mounted in the case (lower left corner). I drilled a small hole underneath each set of connector holes in the NES case that corresponded with built-in screw mount-holes in the DVD AV connectors themselves. I then screwed the connectors in place, and later secured them further with some hot-melt glue.
Also, in this picture the power supply board is now mounted in the case. In order to get the AC power cord through the hole for the NES AC adapter plug without breaking the case, I had to cut off the connector that originally attached it to the PS board. I also de-soldered the matching male connector from the board itself. Then I strung the AC cord through the hole, rewound it through the big ferrite bead, and soldered it directly to the PS board. I fastened the PS board to the case with two screws — one of the screw holes was already in the power supply board; the other, I had to drill myself in an unoccupied part of the board. It worked out really well, though.
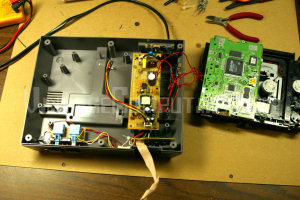
The next step, after putting the semi-opaque IR window in the control port area, was to secure the DVD control board in place so that the IR receiver on the board would be properly behind the window (lower-right corner of case). You’ll soon see how I did this up close…

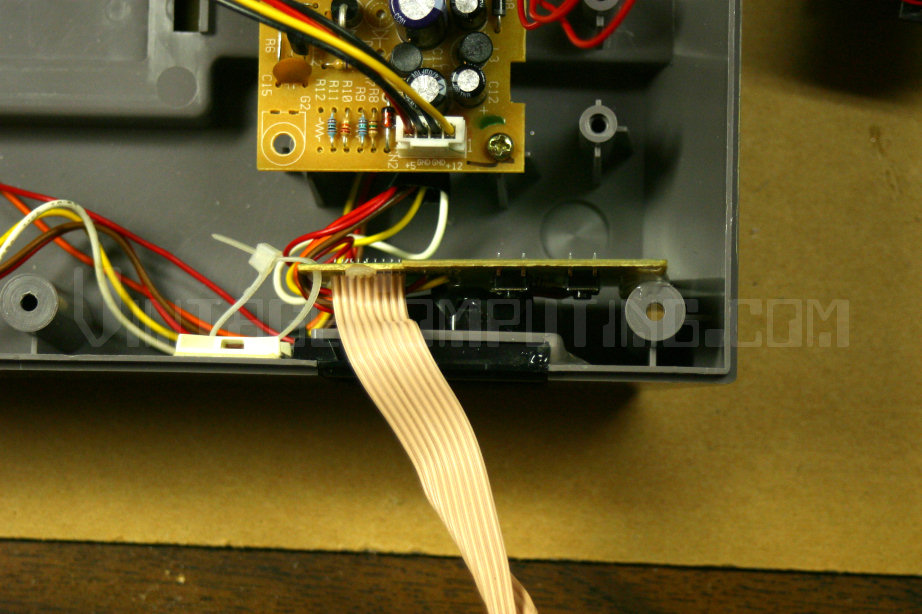
Here’s a close up of the DVD control board mounted to the NES case. Because of its weird vertical positioning, I used a combination of hot-melt glue and a cable tie (strung through a screw hole on the board and also through an adhesive cable-tie mount, stuck onto the front inside of the case) to mount the control board in place.

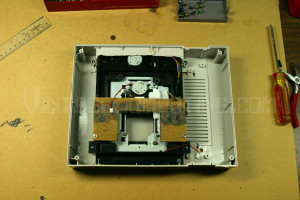
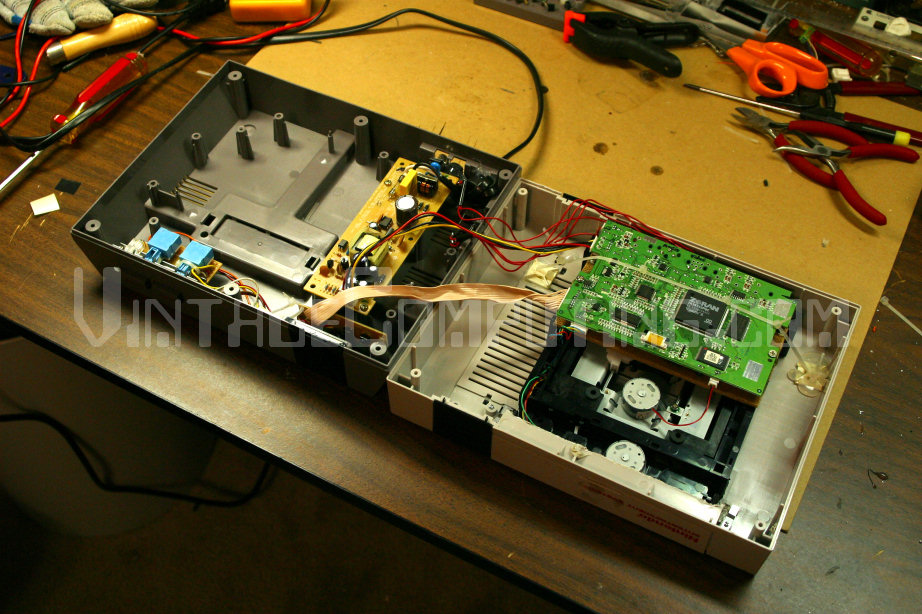
And now for the trickiest part: mounting the DVD drive in place. Because of its positioning, the drive assembly had to be mounted somehow to the top of the NES case. But there are no fasteners or mount points on this part of the case. What to do?
My first attempt at a solution is pictured above, with a series of cable ties and a few adhesive cable-tie mounts that were shored up with hot-melt glue. Unfortunately, one of the cable tie mounts didn’t want to stick to the flat plastic surface of the case while under pressure (even when reinforced with glue). I ultimately resorted to using some pieces of double-sticky tape to affix the top of the drive assembly to the case, but I forgot to take a picture of the final inside guts after I did this. Still, this picture is close enough. After chopping off one more plastic screw post on the bottom of the NES case, it was finally time to close it all up!

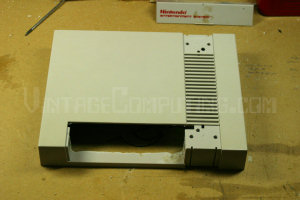
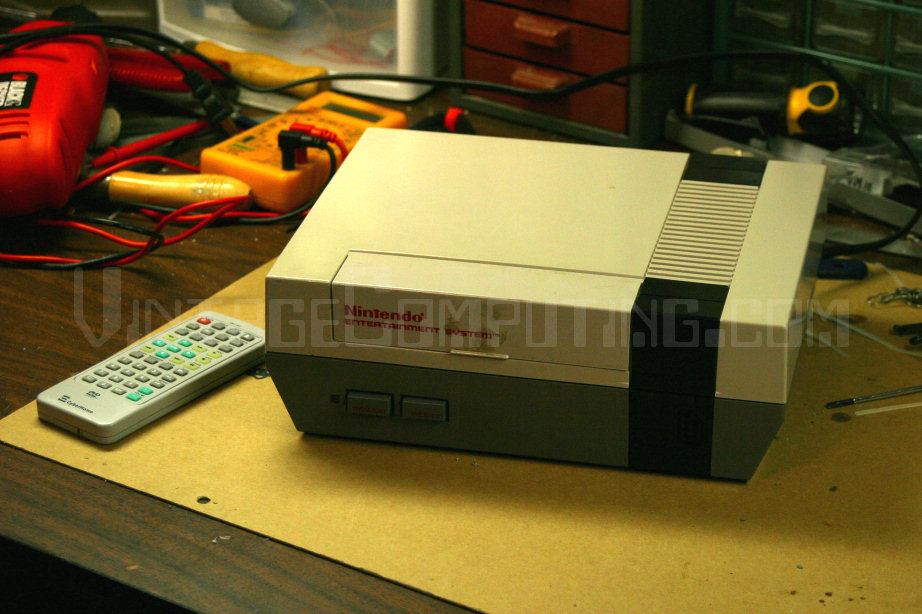
I found some new case screws to replace the original ones I lost long ago, and put them in place. With the unit back together, I tested it and it worked as planned. In fact, it worked even better than planned, with the cartridge slot lid opening and closing perfectly in concert with the ejecting and loading the disc tray. All that was left was to get rid of the annoying, dirty-looking sticker residue (remnants from overzealous childhood sticker application) from the NES cartridge slot lid, and I’d be done. A little naphtha did the trick, as usual, and I was finished. Holy sweet mother of circuits, it took me twelve hours, but I actually pulled it off!
Epilogue: The Dull Roar of Success
Friday, March 3rd, 2006 – 3:56 PM
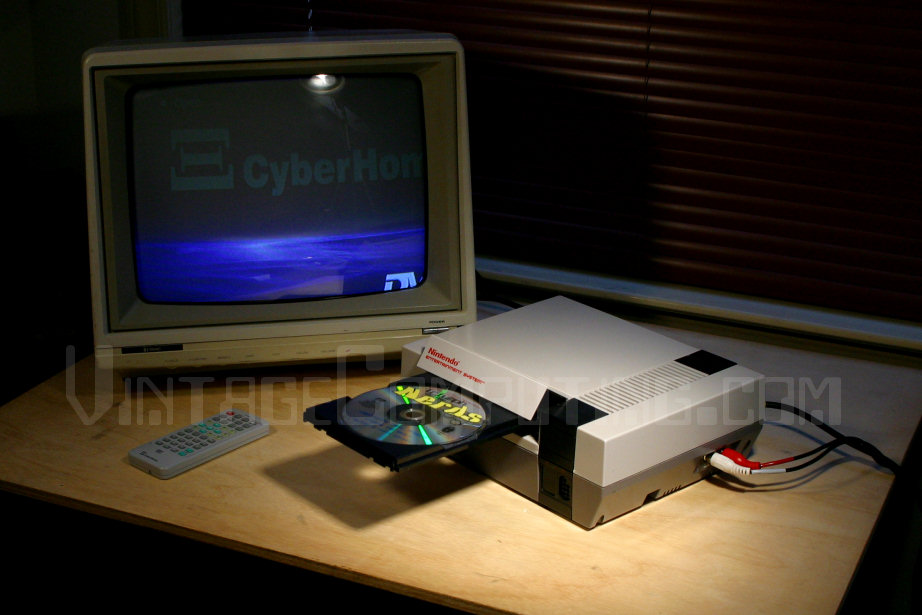
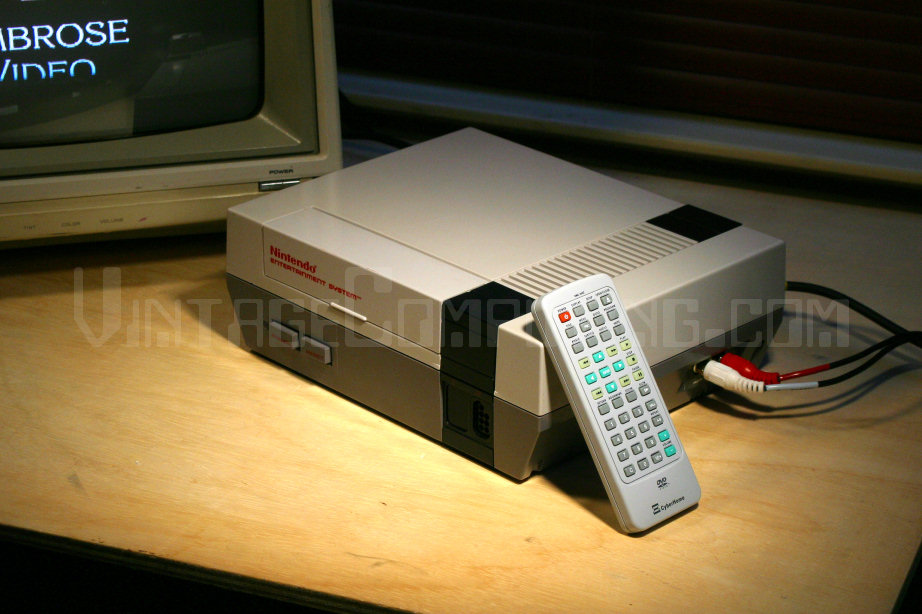
Well, that’s it. I am now the proud owner of a DVD player that is shaped like a Nintendo Entertainment System, and you are the proud owner of scads of new technical knowledge of a dubious nature. Now go back the the beginning of the article and watch the video again, gaining new appreciation of the NES DVD Player’s precision Swiss-timing operation. If you build one yourself, let me know! By the way, does anybody want to hack up a NES control pad and turn it into a DVD remote for this thing? Maybe that should be my next project — we’ll see. Thanks for reading my ramblings, and have fun hacking.
(Update – 06/25/2006: The NES DVD player featured in this article is now for sale on eBay.)
(Update – 07/05/2006: The NES DVD player auction is over. The final price was US $282.73. Kinda makes you want to build your own, doesn’t it?)
This entry was posted
on Friday, March 3rd, 2006 at 5:00 pm and is filed under Hacks & Projects, NES / Famicom.
You can follow any responses to this entry through the RSS 2.0 feed.
You can skip to the end and leave a response. Pinging is currently not allowed.


March 3rd, 2006 at 5:23 pm
Hey, like the hack.
Though I believe somone already hacked a NES pad into a TV remote, having a DVD remote with that would be cool.
Awesome Job!
March 3rd, 2006 at 6:23 pm
That’s awesome! Good job. 🙂
March 4th, 2006 at 11:48 am
http://www.zerosign.net/?p=5
March 4th, 2006 at 1:07 pm
Thanks for the comments, guys. And also for the link, MegaKitsune.
March 4th, 2006 at 2:30 pm
super sweet man i am going to make one.
March 7th, 2006 at 12:54 am
i just started mine yesterday with the same dvd player but ill be tweeking mine abit different than yours and i thought i was going to be the first one to do this but i was wrong. hats off to you man.
March 7th, 2006 at 1:34 am
I always enjoy seeing what types of mods to the old Nintendo Entertainment System people make up. Good job; it’s impressive. I wonder what Satoru Iwata, Shigeru Miyamoto, and the rest of the Nintendo gang think of these mods.
Paul Gale
1up.com
March 7th, 2006 at 12:49 pm
DVD en una super nintendo
Bueno, hace poco tiempo se vio una nes convertida en un pc, creo que apple XD, aquà se ve como unos manitas, han modificado una nes, y la han adaptado con un DVD, eso si, de la nes solo queda la carcasa 😉
March 7th, 2006 at 4:57 pm
Freaking sweet. Good job man.
March 7th, 2006 at 4:59 pm
I know PT of Make magazine. You should totally submit this to Make.
March 7th, 2006 at 6:29 pm
See if you can do a swap. Like, move a PS2 (slim) into your NES, and vice verca. Throw off your freinds!
March 8th, 2006 at 1:12 am
SWEET MAN MA AND MY BUDDY DAN WERE ALREADY WORKIN AON THE SAME THING SWEET!
March 8th, 2006 at 1:13 am
SWEET MAN MA AND MY BUDDY DAN WERE ALREADY WORKIN AON THE SAME THING SWEET!
March 8th, 2006 at 2:22 am
NES med inbyggd DVD
Det var inte sÃ¥ länge sedan vi skrev om en PC-fierad NES, och nu är det dags för en modifikation till. Det är VintageComputing som har en skön artikel om hur du gör om din NES till en DVD-spelare. Värt att kika pÃ¥ om man gillar att modda sa…
March 8th, 2006 at 9:12 pm
nes sucks!!!!!!!!!!!!!!!!!!!!!!!!!!!!!!!!!!!!!!!!!!!!!!!!!!!!!!!!!!!!!!!!!!!!!!!!!!!!!!!!!!!!!!-Xbox 360-psp-ipod (wich i have)rock!!!!!!!!!!!!!!!!!!!!!!!!!!!!!!!!!!!!!!!!!!!!!!!!!!
March 8th, 2006 at 9:16 pm
NES-was good————————————————many years ago:>)
March 8th, 2006 at 9:21 pm
I had nes ,but gladley sold it when other systems came out.now i play my xbox 360- ipod and psp-ps2 and g-cube.San andreas rocks!!!!!!!!!!!!!!!!!!!!!!!!!!!!!!!!!!!!!!!!!!!!!!!!!!!!!!!!!!!!
March 8th, 2006 at 10:27 pm
jus buy a dvd playa dude
March 9th, 2006 at 9:45 pm
gnarly stuff man!!!!!!
maybe you should try fit an n64,snes,slim ps2, or a gamecube
and could you give instructions to build. it would be nice. thanks
March 11th, 2006 at 11:33 am
Nice dude. But you had to hurt a poor NES 🙁
March 11th, 2006 at 12:31 pm
Hehe.. thanks, Tyler. Actually, as I mentioned in the article, the NES I used for the hack was already in pieces and not in the best shape. Besides, I think there are more than enough NESes to go around. They made a lot of them, you know. 🙂
March 11th, 2006 at 11:58 pm
Maybe try getting an original PS1 in there… That would be awesome…
March 12th, 2006 at 10:28 am
That is brilliant well written and funny too, hope it lasts as my cyber dvd died after 3 months
March 12th, 2006 at 1:40 pm
fery vunny. lol
March 20th, 2006 at 9:03 am
I made myself one of these over the weekend, it’s the frickin’ coolest thing I own. Cheers for the idea and the advice, never would have thought to do it otherwise, so dude, you totally rock.
March 20th, 2006 at 9:16 am
Thanks guys, for all the kind words. That’s awesome that you made your own, evil_underlord. Send me some pictures!
March 21st, 2006 at 3:46 pm
Check out my livejournal for a swiftish account of my adventures in the mushroom kingdom. http://evil-underlord.livejournal.com
March 22nd, 2006 at 8:36 am
p.s. It includes a few pictures.
March 22nd, 2006 at 9:07 am
Sweet, man. Good work!
March 22nd, 2006 at 9:20 am
can i buy one how much are they
March 22nd, 2006 at 5:54 pm
cheers
March 23rd, 2006 at 6:39 pm
This has been my downtime in the office side project. I bought a few gutted NES cases a while back and had a Cyberhome player so I thought I’d try it.
If you’re thinking about doing this MAKE SURE you have a fan or a window open. I inhaled gnarly amounts of 20 year old burnt plastic. Once the high wears off it sucks. (Going to try a hobby knife with a serrated edge tomorrow)
There’s a pool going around the office that I’m going to set something on fire and/or lose an apendage. I’ll let you know what happens.
March 23rd, 2006 at 6:59 pm
Hehe.. sorry to hear about your plastic inhalation. 🙂 I warned you! (see the comment under picture #11). Good luck with the rest of the project!
March 24th, 2006 at 7:57 pm
That thing must be the coolest thing ever! I think i’l murder my dvd player(identical as yours lol), pickup my nes (that is sitting there on my table with at least 1 cm of dust on it) and do one! Oh, by the way, i want to say to qaz (that posted on march 8 at 9:12 ) that nes is the best console since it is the first console that mario games were played on(excluding arcades), it is the first console that nintendo created and, you can do lots of stuff with it like
a home made gameboy etc(but about the grand theft auto part, your’e right, that game does rocks). Anyway, 2 thumbs up, good luck for the project and rock on!!!
March 25th, 2006 at 4:21 am
Well gta is coming to the nes from some dude!
http://www.grandtheftendo.com/
March 26th, 2006 at 11:38 am
Hey, does the text actually tell how to do one?If not could you send me the plans how to do one please? Thanks.
March 26th, 2006 at 11:42 am
Sorry, i sent it 3 time by accident. Anyway, send me the plans how to do one please. Thanks
March 26th, 2006 at 11:49 am
Oops, i wrote my wrong adress, heres my good one dacybah@hotmail.com
March 30th, 2006 at 5:00 am
Just wanted to give you another pat on the back! Like a lot of other people who have sent comments, I too have that same DVD Player. I bought my ex a Nintendo a few years ago … now I want it back, Damn! Anyway, awesome job!
March 30th, 2006 at 11:26 am
Thanks for the kind words, Christina. You should get another NES and go for it! 🙂
April 5th, 2006 at 11:57 am
Uhh… Siege, you didn’t have to write that you put your wrong adress, XD.u677
April 5th, 2006 at 12:26 pm
But you told me that!(talking to EnKa)
April 10th, 2006 at 8:04 am
What the heck is naphtha and where can i find some!My NES is completly yelow and its supposed to be light grey!(I can still see the silhouettes
of the removed stickers of Link, the koopa and the weird dog warrior imprinted in grey over the yelow!)
April 10th, 2006 at 11:31 am
Naphtha is a type of lighter fluid (like the kind used to fill Zippos). I always buy Ronsonol brand in a yellow bottle. It’s a great solvent for adhesive gunk.
April 17th, 2006 at 8:34 am
[…] The Ultimate NES DVD Player Hack […]
May 15th, 2006 at 4:40 pm
Forget the NES controller… haxk a PowerGlove into the DVD remote – Way more options and more room to play (besides, the IR emitter would fit well in the glove’s sensors.
Just my $0.02
May 23rd, 2006 at 11:53 am
Thanks for the tip RedWolf!
May 23rd, 2006 at 12:07 pm
Know about the NES pad dvd controller article, i seem to have found the link on your site and can`t find the site adress, could you tell me?
June 7th, 2006 at 12:15 pm
Hey That Graham Guy, what about your $0.02?
June 7th, 2006 at 12:16 pm
Hey, this is practicly a forum, is it?
June 8th, 2006 at 9:49 pm
Excellent idea and very well executed. An enjoyable read and SO refreshing to hear of someone willing to just go for it !
The message – If it isnt on the shelf but it’s in the mind, go ahead and do it..that’s what you spend yer monies on on the shelves, a guy like this and innovation !
Great job 🙂
June 19th, 2006 at 7:40 am
Where can I get some masonite?
June 19th, 2006 at 7:54 am
Here are some reasonnable reasons:
1: If i were gay, i wouldn`t post it on a site(that would be dumb).
2:If I was to post it on a site, people would talk of me differently.
3: I’m not gay cause i would say things like”oooh, the pretty flowers!”(and i’m not insulting gay people)
June 26th, 2006 at 1:01 am
[…] [via Kotaku – VintageComputing] […]
June 28th, 2006 at 3:26 am
[…] [Source] […]
June 29th, 2006 at 4:13 pm
[…] – Would you a DVD player disguised as a DVD player? Well there’s one available right now on. […]
July 22nd, 2006 at 8:42 am
it would be awesome if you changed the NES controller into a remote
July 25th, 2006 at 2:02 am
i moded a nes, but not as well. mine is a didgital clock when u open op the flap, i thought i had the greatest idea until i saw what u did. a dvd player thats awsome
August 3rd, 2006 at 12:11 pm
My grandchildren love to play with my old Nintendo game which is about to stop working. Do you know anywhere that I can purchase another one. I have several old games that they love to play. (l988 vintage)
Pleae e mail me at Peggy5100@aol.com
August 13th, 2006 at 11:01 pm
Wow. I was just about to make one myself! Ironic… Anyway, I have a slightly differently designed DVD player so it’ll be a bit of a challenge to make it work. Especially since the video/audio out ports are all stacked and not individual. Oh, and by the way, whoever posted about NES being the first console Mario games were on is wrong. The Coleco Vision featured a line of Donkey Kong games many years before Nintendo actually made their first system. Incidently, Nintendo made the NES BECAUSE of Coleco Vision. Interesting story behind that 🙂
August 29th, 2006 at 2:33 pm
qaz is fuckibg stupid just felt i had to get that of my heart…
you see there is not a thing in the world that vill ever beat nintendo entertainment system EVER…
i it a real cool DVD. but you disekted a nes and that is kinda cold harted..
September 8th, 2006 at 12:21 pm
[…] VintageComputing […]
October 1st, 2006 at 7:53 am
Just to say to Echo35, it was just to say that nintendo is better than ps2, as the wii is better than ps3. And if you are so smart, what is the japanese version of nintendo
October 27th, 2006 at 11:01 am
haha thats cool and all but it doesnt top my xbox that i put into a NES case. and no i did not copy your idea
October 27th, 2006 at 11:41 am
http://img.photobucket.com/albums/v366/enragedmonk/100_0877.jpg
October 27th, 2006 at 11:59 am
Darko,
That’s cool man. How’d you manage to cram a whole Xbox in there? Great work.
December 18th, 2006 at 8:07 pm
hiya,
i am in the middle of building one of these myself and typed ‘nes dvd’ on google and found yours, the dvdplayer i am using is a durabrand dvd900, the buttons on the front of thenes will now be purly for show as all functions are carried out bythe remote, when the console is turned on at the mains the led is red, hit stand by and the led turns green. apart from a small hole in the front for the remote sensor the nes will look standard. i’ll post you some pictures if you like when its done (probably after christmas)
dan
December 21st, 2006 at 3:52 pm
change of plan, the power buton wil now work and so will the reset but as an eject button, my draw also will push the flap open
December 24th, 2006 at 11:14 pm
Thats awesome!!!!! I just took apart my cyberhome DVD player… it busted… so I was looking up how to get it to work again… and stumbled upon this… This is really awesome… good hack… good job!
December 29th, 2006 at 8:09 pm
i have found a way to make the nes controller control some functions of the dvd player, i have made my start button act as a play button and the select button act as open/close. i will use this idea on the next one i make!!
January 15th, 2007 at 6:13 pm
Too bad those cheap dvd players break after about 3 weeks of use.
Cheap for a reason.
February 25th, 2007 at 7:54 pm
I built my NES DVD this weekend based from ideas of this site. I have everything working great. I used a Diamond Vision DVDV804-03 player for my build.
here’s my features:
– RESET button ejects the tray
– POWER button plays the movie
– FULL S-video, RGB, and component video support
– remote works, IR sensor located in controller 2 port location
– STOP, EJECT, and PLAY buttons located on the right side where the RED & WHITE sound jacks were
– Power switch located in back
– controller works, SELECT = EJECT, START = PLAY, and A & B buttons STOP playback.
Will post a pic soon, just finished screwing the top cover on a half hour ago.
EVERYTHING WORKED on the first try !!! woooot !!!
February 26th, 2007 at 12:42 pm
Sounds awesome, Scorch. Can’t wait to see some pictures.
March 6th, 2007 at 1:13 pm
Las PCs son lo mas…
Ciao…
March 7th, 2007 at 8:28 pm
Here’s my aricle I made for my build. Many thanks to you Benj for the inspiration on this. Hope you enjoy.
http://scorch1972.tripod.com/NESDVD.htm
March 8th, 2007 at 10:03 pm
Great work, Scorch. Thanks for sharing!
March 8th, 2007 at 10:06 pm
The jap nintendo is the famicom
April 17th, 2007 at 7:17 am
hi!
I like your DVD-Player and try to build my own NES-DVD player. But i don’t know how to solder the wires to the buttons of the dvd-player (I want to use the original power- and Reset-Buttons of the NES). Can anyone help me?
April 17th, 2007 at 10:27 am
Michael,
I’m not sure what your problem is specifically, but searching for “how to solder” or “soldering tips” on Google will reveal many tutorials about soldering that might help.
April 18th, 2007 at 8:01 am
Thanks for the answer. I figured it out by myself. Now the NES-Buttons work with the Buttons of the DVD-Player. I knew how to solder, I just had trouble where to solder the wires correctly to the DVD-Player. I did it, but the LED doesn’t work, because I had to use the original-power-switch of the DVD-Player (I just replaced the Original Button with the NES-Power Button). How should I solder the LED, so that it works when I put on the DVD-Player?
Sorry for my English, I’m from Germany 😉
April 19th, 2007 at 11:59 am
Michael,
Are you saying that you aren’t using the original NES power switch/LED assembly, but instead you soldered the NES power switch onto the DVD player’s circuit board? If that’s the case, then I’m not sure how to wire up the LED because it would depend on your DVD player.
April 19th, 2007 at 1:51 pm
Inversely 😉 I replaced the Original NES-Power Button with the Power Button of the DVD-Player and soldered on the NES Button thing (the left board: http://www.vintagecomputing.com/wp-content/images/nesdvd/nesdvd_29_large.jpg). I had to use it, because the Original NES Button made this weird sound when you pressed the Button (It sounded like a fuse that gets broken. I think it was too much Power for the NES-Button, so for safety reasons, I used the original DVD-Player Button). My new Button doesn’t use the Board- Circuit anymore, its just sticked on with some hot melting glue to look original from the outside of the NES.
April 24th, 2007 at 2:03 am
Hi. I just completed my own NES DVD player and wanted to share some pictures. If anyone would like to know a good DVD player to use, I recommend the RCA DRC200N, it has two very small separate modules (power and everything else) and the drive required very little modding to make it fit. I got it at Best Buy for 34.99. My features include: all ports still available on back (except S-video), original switches and plugs from NES still inside the case (just rip that part of the circuit board off the NES mobo). Pictures are here: http://new.photos.yahoo.com/danielem1/albums. I had a lot of fun doing it. I wanted to do the remote too, as an NES controller, but I had trouble soldering onto scratched off circuit board traces, just couldn’t get anything to stick, if anyone knows a good way of hijacking remote control circuits, please let me know.
June 11th, 2007 at 1:25 am
I just finished makeing mine. I used a Magnavox MWD200GA. It works great exept I could not get original nes led to work. But otherwise it is awsome. How hard would it be to put a Wii into and NES case? Thanks for this tutorial.
July 7th, 2007 at 9:14 am
I want someone to make me a to-scale micro ATX case that looks like the old NES. I’d pay highly for it if I had the money.
July 17th, 2007 at 3:54 pm
Help me Someone Please.
I’ve built my NESdvd however i’m having problems w/ the NES buttons.
I used this picture for a reference however the power and eject buttons are not working. http://www.vintagecomputing.com/wp-content/images/nesdvd/nesdvd_29_large.jpg
I think i confused where to solder the wires.
Also, i’m trying to move the IR sensor but i don’t know if regular wires will work as extensions.
Any suggestions are welcome
thanx
al
July 19th, 2007 at 9:10 pm
dude. i went to a pawn shop, and i found all the NES’ in the back, and i mean at least 200!!! they said i can get 10 of em for $40!!! I TOOK THAT DEAL! now i got 7 working NES DVD players! (working on the other 3)
YOU ARE THE BEST MAN! KEEP ON WORKIN! suggestion: make an NES photo printer. think about it 😉
KEEP ON TRUCKIN!!!
August 16th, 2007 at 9:00 pm
I was wondering if you could help me. I’m hooking up my own NES DVD player and just have a quick question about the LED.
I am trying to keep the original wires coming off of the power/LED switch for my system. The problem I have is that the LED will not work.
Assuming I have this correctly then the white wire is the LED power wire and it shares it’s ground (the brown wire)
Is there anything obvious as to why the LED won’t light?
Thanks for your help.
Matt
August 21st, 2007 at 2:57 pm
The LED part is a little tricky and seems to give many people trouble. On the NES LED/Power switch board, I had to cut a trace and add an extra wire to hook it up properly to my DVD player. I don’t remember why exactly, as I don’t have that board in front of me at the moment. You may have to do the same. This picture is the best representation of what I did, although I know it’s hard to make any sense of it.
August 22nd, 2007 at 7:21 am
another thing regarding the LED issues everyone is talking about, be sure the polarity of the power you are sending to it is correct, LEDs don’t work like regular lightbulbs, one end of the LED HAS to be Positive or it won’t work PERIOD.
If it’s not working, reverse the wires to it. if it’s still not working, then your problem is elsewhere.
August 22nd, 2007 at 12:59 pm
Thanks guys, I was thinking it must be something to do with the shared ground. Since the ground the reset button is hooked up to isn’t the same ground as the 5V from the DVD player I guess I’ll have to try hooking the LED’s ground separately to the ground of the 5V and add a 100Ohm resistor between the two.
Again, Thanks for the info…
October 10th, 2007 at 1:25 pm
Wow just started working on one of my own. 🙂
November 2nd, 2007 at 6:26 pm
AWSOME GOOD JOB MAN!!!(ITS SUPER DUPER AMASING!!!)
:-$ 😀
December 30th, 2007 at 10:19 pm
Hey, nice work on the NES DVD player.
I would do the same thing, except my now-21-year-old NES still works, and I have no intentions of breaking it either. I don’t really use it, but that’s my goal: to not use it too much, as the game cart connector can and will eventually malfunction. Malfunctioning is a process that I want to prevent. So, to pass my time, I’m usually on my DS Lite, or on my computer.
On account of all the PSP, XBox, Zune, and PC users on the planet, I now say unto you as Charlie the Unicorn has once said…..
“Shun the non-believer!”
April 17th, 2008 at 11:40 am
Klootzakken =P
September 27th, 2009 at 2:40 am
Just found your website. I found one of my broken NES systems. I had one left. Lucky I didn’t throw it away. So I’m just about to buy a cheap DVD player. I think I have seen one for $10.00 (australian) but I don’t know where. I can wait to turn it into a dvd player.
March 15th, 2010 at 11:02 pm
Nice work on the dvd. I am trying to make a wiitendo and I am having issues with the power and reset button. Power will obviously be the power button and reset will be the eject I am just having issues either chaining the two together or finding the proper wiring diagram. Any help?
plasticparade@gmail.com
June 30th, 2010 at 7:46 am
Why not, So you can do better will call Report NEWS WORLD channel that because of your make from man that stylish for No.1 NES DVD player in long many year ago! xD
March 10th, 2011 at 4:18 pm
I’ve been working on replicating this myself, but am having trouble wiring the power and reset buttons.
I’m new to this sort of thing, and the nesdvd_29_large.jpg image doesn’t show exactly where all the wires are supposed to be leading.
Here are two pictures showing how I currently have my wires set up:
http://lolacakescolorado.com/dvdstuff/IMG_0032.JPG
http://lolacakescolorado.com/dvdstuff/IMG_0027.JPG
This is not working at all… it’s wired differently than showed on this website, I wired it as shown on this image from exoid.com:
http://lolacakescolorado.com/dvdstuff/ninvid3.jpg
Any help or direction would be appreciated…
March 10th, 2011 at 6:51 pm
Breadstick,
It’s been so long since I did the NES to DVD hack that I can’t help you much besides pointing you to the comments on this page — others have had similar trouble wiring up that board. I remember that I had to cut a trace on the board for some reason the way I wired it up. Try to study the nesdvd_29_large.jpg picture if you can, as that’s the way I did it.
Good luck. I’d love to see the finished result when you’re done!
August 30th, 2011 at 6:27 am
Benj, I am doing this with my spare NES Parts, i had in my shed. I have won several NES autions off of ebay since im HATING my PS3…Im going retro. So instead of trashing the busted NES, I am going to do this mod. I already have the DVD player…. Just wondering what type of wire u used with the AV ports being moved. I want to do mine like yours with a few changes. I want the IF remote port in player 2 port. and in player 1 port i want to be able to attach any controller to it and be able to play the dvd, for example the direction buttons to move on the dvd menu screen, the select button to play the dvd the start button to pause, and “A” button for chapter forward and “B” for chapter reverse etc ( I still have to check the DVD i will be using so whatever buttons are on the unit itself i will want to put through the controller even though i would have a remote to do it, i still think it would be cool to do … any ideas or suggestions?