 It’s not a myth if it’s true. Yes, Mario, there might be a Famicom to NES adapter in your copy of Gyromite. In fact, there might be an adapter in other early NES games, but so far, Gyromite is the only game cart I have personally found adapters in. Recently Jake at 8-Bit Joystick was bustin’ on the well-known NES fan fact that there are NES to Famicom converter boards in some early NES games. Well, I’m here to try to set that straight. For the record, I’ve bought eight copies of Gyromite in my life, and two of them had Famicom converters in them (25% rate so far). I’m not going to speculate on the absolute ratio of Famicom to non-Famicom Gyromites out there, or even why the adapters are in there in the first place. Instead, here’s a quick guide to show you how to determine if any copy has one of these hidden treasures inside.
Method #1: Label Variations
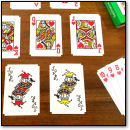
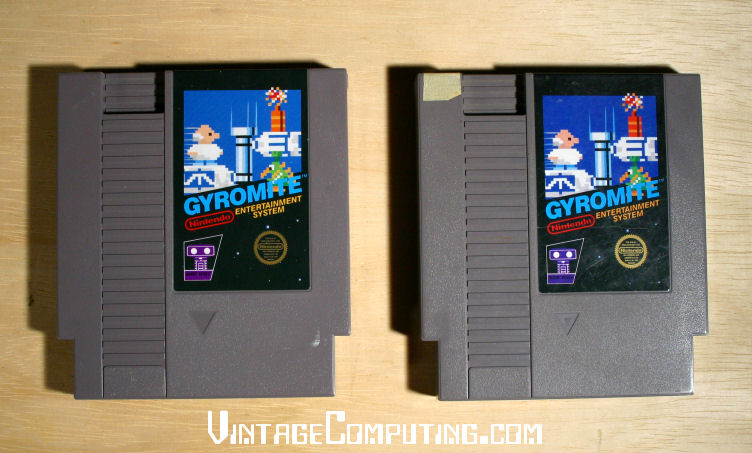
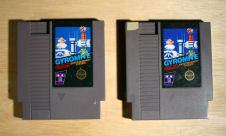 I’ve noticed that there is a small difference on the labels of my two copies of Gyromite with Famicom adapters in them (henceforth to be called FA Gyromites) and the ones without adapters (henceforth to be called regular Gyromites). The difference is subtle but noticeable if you can compare the two, or if you have a really good eye for color. Take a look at the picture on the right. Click on it and load the full-sized image. Notice the “Robot Series” logo on the cartridge on the right (the FA Gyromite copy has a piece of tape on it so I know which is which).
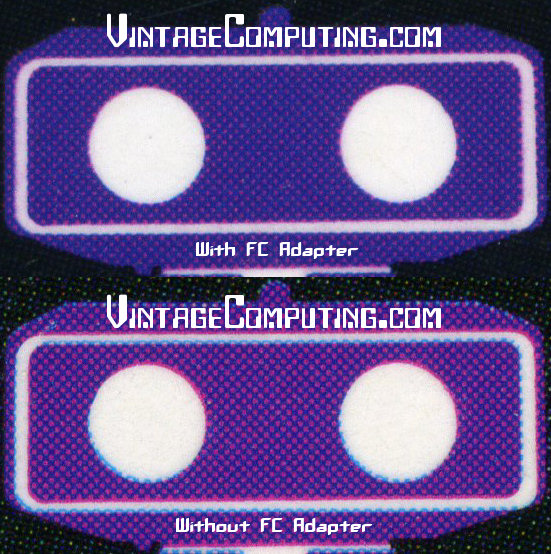
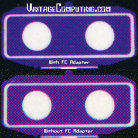 The color of the purple in the FA Gyromite is a different hue than the regular Gyromite on the left. The two FA Gyromites I have have less red in the Robot Series color, making for a softer, deeper “grape” color, whereas the regular Gyromites have more of a “plum” color to them, with more red in the label. Also, the black background in the regular Gyromites is of a lighter, more washed-out looking color than the deeper black in the FA Gyromites. Also to the right is an up-close comparison of the two labels. Note the difference in red content in the half-toning pattern and the difference in the surrounding black background.
I can’t promise that this color difference will hold true for all copies of Gyromite, but my two copies of FA Gyromite and five copies of regular Gyromite all follow the same color differences described above, so I thought I’d mention it.
Update: Shortly after writing this article, I noticed another difference between FA Gyromite and regular Gyromite labels. On the label spine where it says Gyromite in purple, my FA Gyromites have a tiny “TM” trademark symbol after the title. All of my Gyromites that don’t have TM symbols are regular Gyromites, indicating that they changed the label later in the production run. But this is where it gets slightly complicated: I do have one regular Gyromite with a TM symbol, so the TM is not a guaranteed indicator that it’s a FA Gyromite. But I’m willing to bet a lot that if it a Gyromite cart doesn’t have a TM on the spine, you can rule a FA out — it’s a regular Gyromite. Further experience will be necessary to make sure this is completely true, but I think it’s almost assured. And before you start complaining that I’m wrong, make sure you’re looking at the label spine (the edge of the cartridge opposite the connector), not the main label face.
Method #2: Center of Gravity
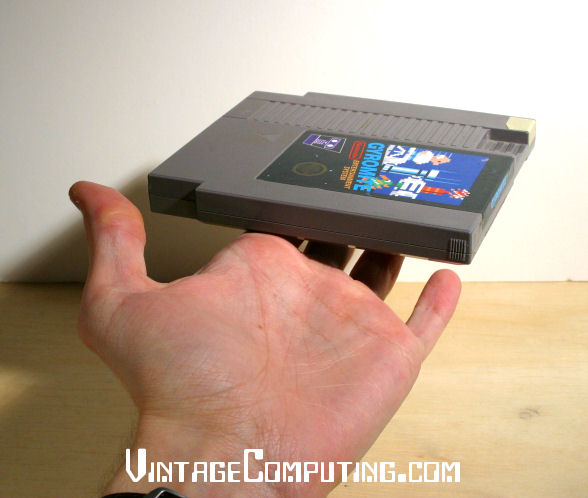
 This is the least scientific test of the bunch, unless you want to go to the trouble of precisely balancing the cart on a specific pivot point. In lieu of such complicated measures, you can use your hand. Pick up a copy of Gyromite and hold it in your hand like the picture on the right. If the center of gravity is more towards the middle of the cartridge than toward the connector (and the weight is spread out a little more evenly), then it’s likely that you have a FA Gyromite in your hand. You’ll see why in a minute.
Method #3: Weight
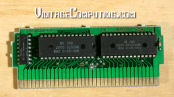
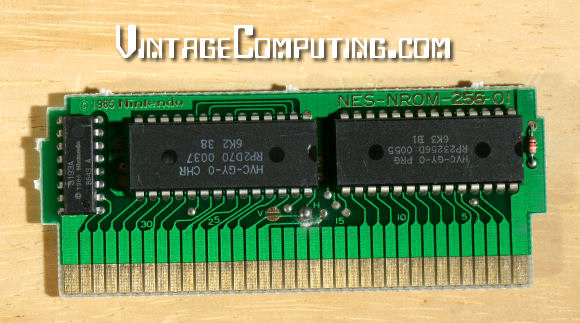
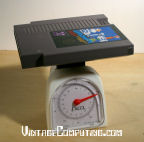 This test is my favorite of the bunch, because you can quantitatively tell if your Gyromite has an adapter without opening it up. If you happen to have a scale that can read in ounces, you’ll find that a regular Gyromite cartridge weights about 3.5 ounces, and a FA Gyromite weighs about 4.5 ounces. The extra ounce comes from the converter hardware inside, which you’ll see in a minute. I tested my other early NES games and they all weighed 3.5 ounces, telling me they don’t have adapters inside. Also worth noting: I just realized that the pictures of FA game carts (one is Gyromite, one is Hogan’s Alley) on this page and this page have full-size DIP ROM Chips on the boards instead of glob-tops like mine (which you’ll see in a minute). That would definitely make a copy of FA Gyromite with DIP chips heavier than 4.5 ounces.
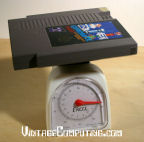 I also weighed a later NES game (Kirby’s Adventure) and found that it weighed about 4.5 ounces as well. Does this mean Kirby’s Adventure has an adapter inside? No — it has a bigger board to make room for a battery and likely heftier ROM chips since it’s a bigger game (in KB terms). So keep that in mind if you’re planning on doing a hand weight test in a store. Pick up a copy of Gyromite and compare its weight to another early NES game (like Pro-Wrestling, but not Zelda, which is also heavier because of its battery). If it feels slightly heavier, then you’ve probably got a FA Gyromite in your hand.
Method #4: Open the Cartridge
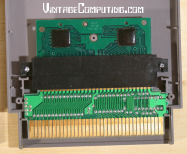
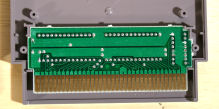
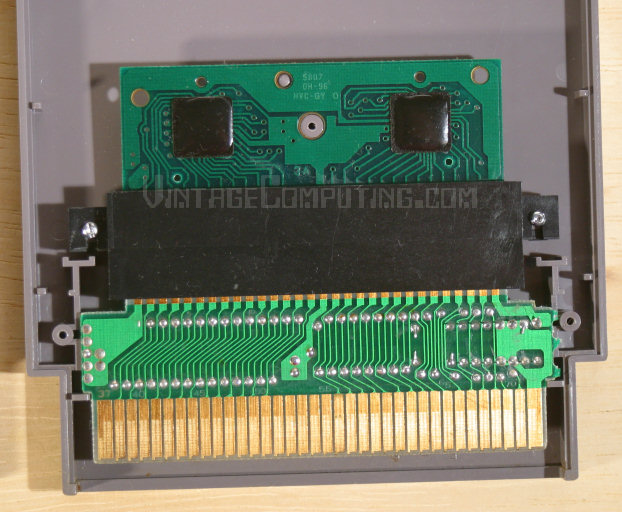
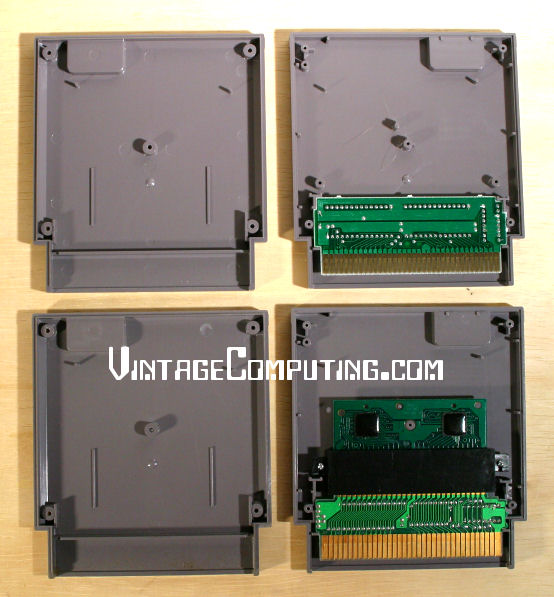
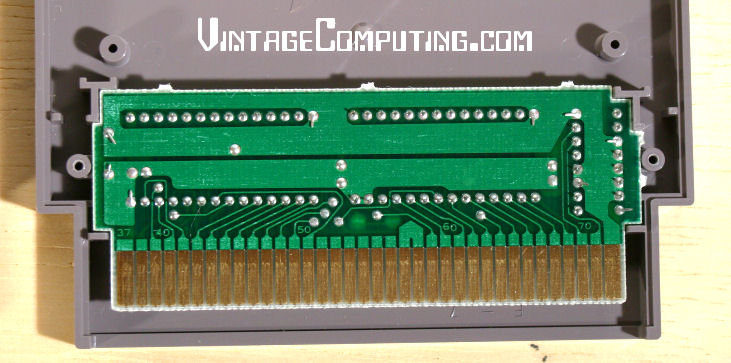
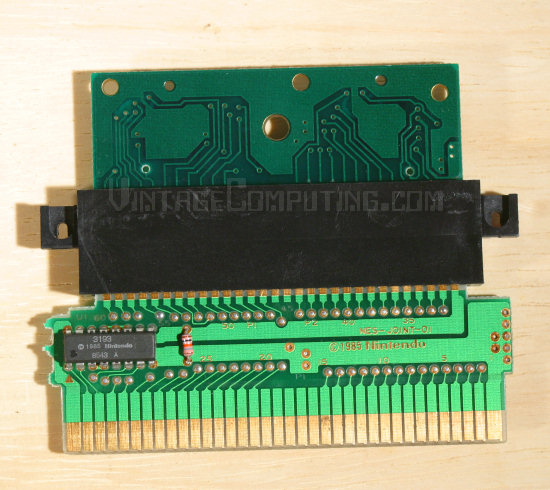
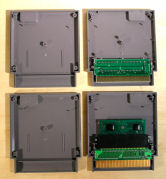 Unlike Jake and Ben Heckendorn, I actually have an array of screwdrivers on hand, arranged nicely in a toolbox. 🙂 There will be no smashing/ripping open NES cartridges today. All it takes is a small flat-blade screwdriver to open your Gyromite cart. All Gyromite carts have at least five screws (unlike the later three-screw NES carts), but if you have a FA Gyromite, you’ll be surprised to learn that it actually has seven screws in total! In the picture on the right, I have two copies of Gyromite open. The one on the top is the regular Gyromite, and the one on the bottom is the FA Gyromite. Notice how the adapter/game assembly is screwed down to two posts inside the cart. Ah-ha — so that’s what whose posts are for! If you unscrew the adapter assembly, you’ll notice that it’s in three pieces. There’s the top board, which is the Famicom board with the ROM data on it, then there’s the 60-pin pass-through connector, and then there’s the bottom adapter board. Here are some more pictures:
The FA Gyromite assembly up close.
The regular Gyromite board up close.
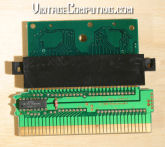
The other side of the FA Gyromite assembly.
The other side of the regular Gyromite board.
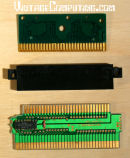
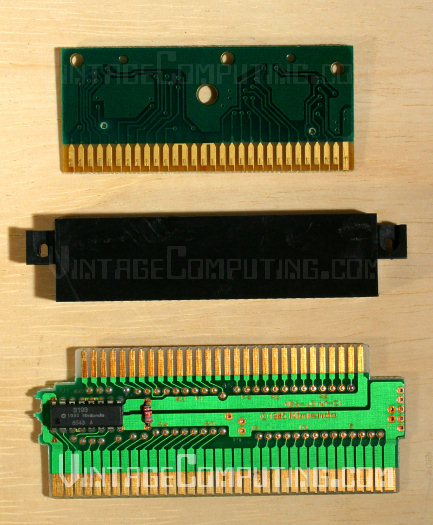
The FA Gyromite assembly in three pieces.
Some Notes on Using Your New Famicom Adapter
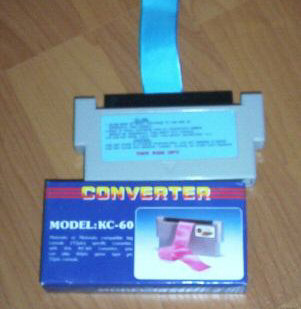
I did some simple testing using the FA Gyromite ROM board and the adapter itself. First of all, I plugged a Famicom cart, Zippy Race into the FA Gyromite‘s adapter and tried it in a top-loading NES. It worked perfectly. Then I put the FA Gyromite ROM board (the Famicom part only) into a Famicom, and no surprise, it played perfectly as well. It is very important to make sure the board/cartridges are facing the right way when you use them in a NES. The front of the Famicom cartridge should be facing opposite the front of the adapter (the side with the IC on it). Then, the front of the adapter must be facing either up (on a front-loader), or forward (on a top-loader). Also, you’ll have to flip the 60-pin connector on the adapter around so a Famicom cart will fit on it, and you might even have to trim a bit of the black plastic off the sides so it fits correctly. You might be able to chop off the top of a standard NES cart and screw the adapter into it, as it was in the Gyromite cart, so that you don’t have to handle an unprotected PC board all the time and you can use the same adapter with different Famicom games. Also, the mountability of the adapter in an NES cartridge case brings about the possibility of making a permanently converted Famicom game. That is, you could disassemble your Famicom cart, take out the ROM board, mount it in a NES cart case (ala FA Gyromite), and screw it back up. Then you’ve got a sturdy Famicom game ready to play any time that you want on your regular NES! Whether the adapter works perfectly with later Famicom games is unknown by me. You’ll just have to test that yourself.
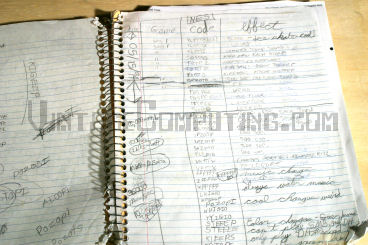 The Game Genie is without a doubt the coolest peripheral I’ve ever owned for the NES. When I was bored with regular old NES games, I could essentially “reprogram” them with the device and make them more interesting. Tired of being told by game designers that I had to play the games their way, I delighted in manipulating game mechanics. After all, I thought, I bought the game, and I should be able to play it however I want (“Game Genie: empowering the gamer since 1991”). Before long, the codes included in the official Game Genie booklet got boring, so my brother and I made up our own. This resulted in some particularly reality-bending codes, the best of which I have included here. Some of these codes might have been discovered by other fellow Game Genie enthusiasts since then, but I assure you, these are straight from my circa-1994 spiral-bound, home made Game Genie Book. This first entry on GG codes deals only with Super Mario Bros. More specifically, the Super Mario Bros. and Duck Hunt cartridge was used to make these codes. Try them out yourself and have fun. Also, feel free to share your own codes in the comments section!


 Over time on VC&G, I’d like to introduce vintage gamers to obscure, overlooked or never released in North America games that are worth playing. And unless you live in Asia, you’ve probably never played Moon Crystal, as I believe it was only released in Japan. It’s a shame this title didn’t come to the US — it’s a grade-A quality game, with incredible gameplay, graphics, and animations. The only beef I have with the gameplay is that it takes a long time for your character to turn around (a lot longer than the instant 180 in most games), and that takes a lot of getting used to. All of the monsters and the main character have very fluid animations, with more frames per movement than I think I’ve ever seen in a NES game. Moon Crystal also has a great story-telling intro and detailed, animated, and colorful cinematic cut-scenes between stages (ala Ninja Gaiden).
 I haven’t played much past the third stage yet, but I’m looking forward to the rest of the game. So far the difficulty level hasn’t been too hard. The style of gameplay is pretty typical action platformer, where you jump around and stab enemies with your sword. You can also get power ups over time to become stronger, which is nice. The main character has a really neat ability taken straight from Prince of Persia — the edge grab. You can jump up to a platform that’s too high for you to jump to conventionally by pressing up on the control pad while jumping. Your character can then grab onto the nearest ledge and pull himself up. This comes in handy as a last-second save: if you underestimate your jumps over an open abyss, you can hold down up and grab on to the side of the edge before you fall in.
 It’s an endless struggle; an epic, no-holds-barred wrestling match: Man vs. NES in a fight to the death. Or at least, in a fight to get your NES games working on that old front-loading NES. You push, it blinks. You pull, it blinks. You blow, you sneeze, you use q-tips, cleaning kits, and wow…it works? You see the title screen, but it’s still a little flaky. Things might be a little garbled, so you hit reset and it looks OK. Then an hour into playing, you accidentally tap the console and the game freezes, forcing you to start your Metroid game all over again. Blast! It’s hard to remember that your NES ever worked on the first try. There’s a fine art to actually getting a game running on an old NES. It takes a lot of patience and a certain flick of the wrist. I used to impress people at parties with my NES-charming abilities, and boy did the ladies love it.
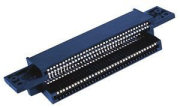 The crux of this classical problem is a special connector inside the unit that wears out from repeated usage over the years. It was designed in such a way that a game cartridge can be inserted at a slight angle with little resistance, then pushed down in the spring-and-latch loading tray inside the NES, bringing the cartridge’s contacts in full contact with the connector’s pins. It’s sort of like a cartridge port version of a
 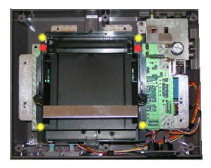 I took a dive and went with a
  Over the past 6 years I have been looking for an easy way to interface my original NES pad with my PC so I could play NES games on an emulator with an authentic feel. There was only one realistic option I knew of: a parallel port interface hack that had spread around the Net over the years, but I never quite got around to doing it. Then, early this year I stumbled across
  I received my
  The compatibility problem brings me to another issue. I suspect that the Messiah guys didn’t do the hardware development on this machine. I think they probably repackaged the latest Asian gray-market Famicom clone, perhaps adding the built-in wireless controller functionality themselves in the process (supposedly its best selling point, although I have not tested it). If anyone can find some hardware design credits on their site (There are none in the system manual, only to the “President” and some marketing guys), let us all know. This whole thing stinks like fish. And speaking of the President, here’s an inspiring word from the man himself, direct from their May 23rd, 2005 press release: