Performing a Permanent Famicom to NES Game Conversion
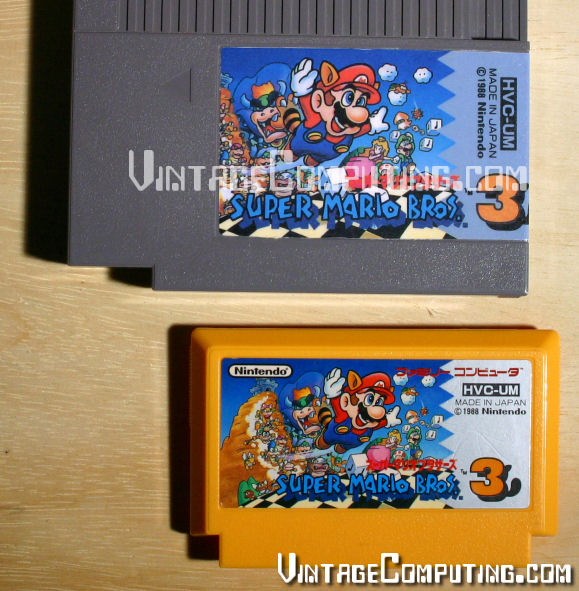
December 5th, 2005 by Benj Edwards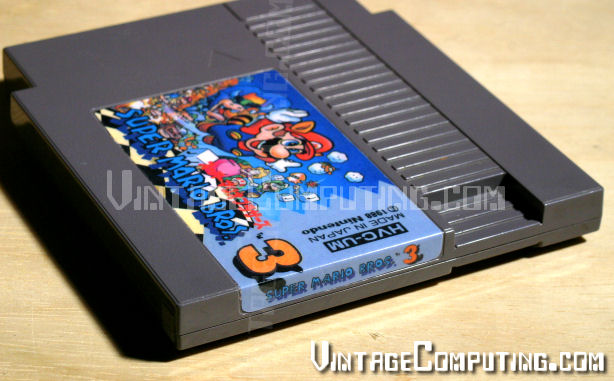 In the VC&G article How to Tell if a Copy of Gyromite has a Famicom Adapter in it, I discussed how certain early NES game cartridges, especially Gyromite, have Famicom to NES converter boards built into them. Near the end of the entry I suggested that one could use such a board and an empty NES cartridge case to build a permanently-converted Famicom game for play on a regular American NES. Well, last week, I decided to actually do it. I chose a common Famicom game, the Japanese version of Super Mario Bros. 3 as my first guinea pig. There aren’t that many notable differences between the US and Japanese versions of SMB3, so this sort of game conversion would be better suited to a particularly good game that was never released in the US, or another game with more important differences between the US and Japanese versions. I don’t have that many Famicom games, so hence the choice.
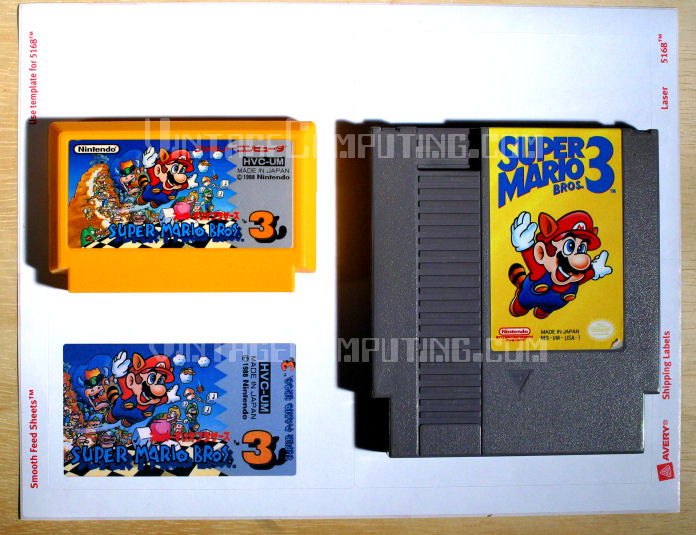 The project wouldn’t have been much of a project if I hadn’t made a custom label for the cartridge. That is the only step in such this conversion that required any serious labor (unscrewing screws isn’t that hard). First, I carefully measured the dimensions of a regular NES label (approximately 2.125″ x 3.8125″ to save you some time). Actually, I ended up using a second measurement in millimeters, but I forgot to write that down. Then, for the primary label artwork, I decided to scan the label of the Famicom SMB3 cartridge and start with that. I edited it in a number of ways, erasing some Japanese text that got in the way of my design, flipping a few things around, and making it fit regular NES label dimensions. I used a modified SMB3 logo from the game’s title screen for the title on the spine. After a few hours of tinkering, the label design was done. And for your notes, the final label is 650 by 1146 pixels at 300 DPI.
Next, I had to figure out what sort of adhesive paper I would actually print the label on. I happened to have some Avery 3.5″x5″ self-adhesive labels on 8.5″x11″ computer printable sheets lying around (Avery number 5168) that would do just fine with a little trimming. I also had some clear, self-adhesive laminate sheets lying around that would give my label a more professional glossy look. There are probably a million better ways to print a custom NES label with different materials, but I just used what I had on hand.
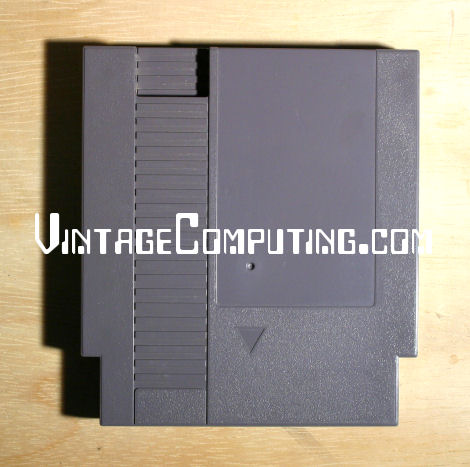 I did some tests with regular paper first to make sure my label would fit. Then I set up the page margins to print the label properly on the Avery sheet and printed it out in a high quality photo mode on my ink-jet printer (nothing special at all — just an Epson Stylus Photo 820). Then I went to work removing the old label on the Gyromite cartridge. I have eight copies of Gyromite, so this was no big loss. The best tip I can give you for label removal is to use lighter fluid (naphtha). It works as a powerful solvent without damaging plastics — the adhesive on just about any label dissolves in it and then you can peel the label off, sometimes with no trouble. Squirt some on there, wait for it to soak in and slowly start peeling with your finger nail or a hard plastic tool (so you don’t scratch the case). An important thing to know is that you should immediately wipe up the lighter fluid and adhesive residue you get the label off. If the lighter fluid evaporates (and it evaporates pretty fast), the adhesive will be left behind and your cartridge will be sticky again. You want to get the cartridge clean and smooth for the new label you’re about to put on. Also, remember not to juggle flaming fire-sticks while doing this at the same time.
So, now we have a clean, young, blank and impressionable cartridge upon which to impart our new label. The next step in the label process, after applying a laminate over the printed Avery label, is to actually cut the NES label out of the bigger self-adhesive page you printed it on. You can use an X-Acto knife for accuracy, scissors if you’re impatient, or perhaps a guillotine-like paper cutter for straight edges. I did mine a little sloppily, which I regret. The rounded corners of the label are hard to cut out properly. Also, since my design had no bleed, (a printing term for an image purposely going outside of the designed cutting boundary) it was difficult to cut precisely along the label’s line without including any white (from the surrounding unprinted material) on the edges. My recommendation: if you have the luxury of designing big artwork that can bleed a bit off the edges, make it bleed and you’ll get a much better result when you cut it (sounds gruesome, doesn’t it?). Although with a bleed you’ll need to have either a NES-label-sized blank cutting template or a faint outline printed out on the label to tell you where to cut.
 Ok, enough of the cutting. After you have the final label, it’s time to apply it. Carefully peel off the backing from the self-adhesive label you’ve created, and start applying the label on one end (I chose the bottom of the recessed label space on the cartridge face), making sure to slowly, evenly, and firmly push the label down so you don’t get any waves, wrinkles or bubbles in the label. Also, the label will obviously have to bend around the cartridge from the spine to the face, or vice-versa, so be careful about that too.
Once you’ve applied the label, you’re almost finished! Well, except for one very important detail: you actually have to get the game inside the cartridge to match your new label. Cracking open a traditional Famicom cartridge without breaking any plastic tabs is not easy (some don’t use any screws). I’m not even going to try to describe how to do it properly other than to say that there were four tabs locking into place on my Super Mario Bros. 3 Famicom cartridge: two at the top, and one on each side (see the picture for positions). Your best bet for dismantling a cart without breaking anything is to use a very flat, thin, but wide-bladed screwdriver to try to pry it open. If all goes well, then you can always change your mind and put the Famicom board back into the old case. If you break a tab, it will still hold together anyway. But if you accidentally rip the whole thing apart, then I guess it really will become a permanently converted Famicom game.
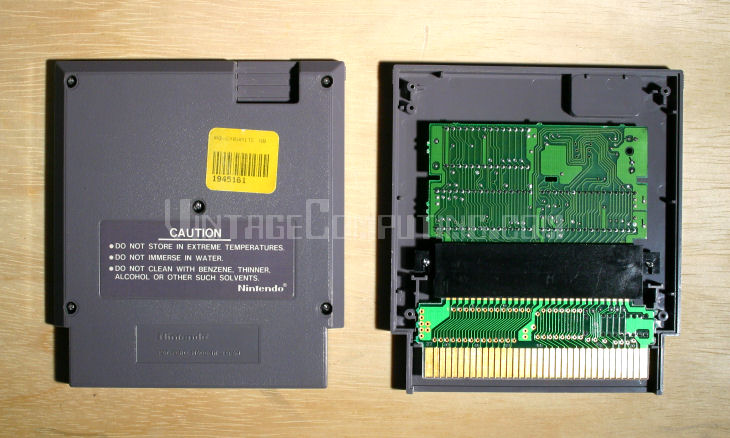
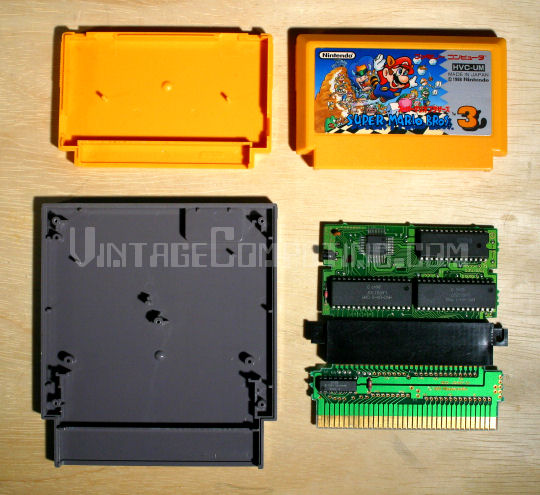 You will also have to disassemble your Gyromite cartridge (the one with the converter board in it). They typically have five screws that require a small, flat-bladed screwdriver for unscrewage (that should be a word). After that, you’ll have to unscrew the two screws that hold the Gyromite ROM board and adapter assembly down on the face half of the cartridge. Then, unplug the Gyromite ROM board from the connector on the top assembly and set it aside, feed it to your dog, or play it in your Famicom — we won’t be needing it anymore. Get some isopropyl rubbing alcohol and some Q-Tips (TM) and thoroughly clean the connectors of the Famicom game you’re converting. Also, give the connectors of the conversion board itself a good cleaning. Then plug your desired Famicom game’s board in where the Gyromite ROM board was. Be extra careful you have it in the right way: the former “front” of the Famicom board should be facing away from the front of the NES cartridge when you screw it back in. This is also a good time to test the assembly (if you have a top-loading NES) to make sure your game will work with the adapter and that everything is oriented the right way (hmm.. maybe we should have done this before making the label). I’ve accidentally put Famicom games in backwards before using the Gyromite converter and nothing blew up. So I guess that’s good news — if it doesn’t work, try flipping the board around.
 Once you have the boards (game board and converter board) mated together properly, you may or may not have to remove two plastic posts from the center of the NES cartridge case to get it to fit. It all depends on how big your Famicom game’s PC board is. My guess is that you’ll probably have to do it anyway, as I did in the case of using SMB3. Various methods could be applied for proper post removal. One nice technique that comes to mind is to cut them off with a rotary cutting tool (like a Dremel). You could also snip them off with heavy gauge wire-cutters. But I didn’t feel like doing either, so I simply lit a butane torch, heated a screwdriver blade and melted the post off in a nice, clean, flat, and dust-free fashion (Kids, please try this at home). Don’t try to break the posts off by force or you might leave a nice round hole in the face of your NES cartridge (I tried the same thing back in 1991, with the aforementioned undesired results).
After plastic post removal (or PPR, as the pros call it) is successful, put your new game-converter assembly into the cartridge and screw it in with the original screws that once held the Gyromite assembly in place. Then put the back on the cartridge and screw that down as well, also with the original screws, EXCEPT — do not attempt to screw the middle/center screw in the back of the cartridge. Since you previously cut the receiving post for that screw off, it is no longer there, and in its place is a Famicom game board that could easily be damaged if you try to force a screw through the hole. Having done that successfully, the game is now in one piece and ready to play. Try it out and have fun! Let me know how it goes.
Update (09/28/2006): To download the actual label graphic that I made for the Japanese version of Super Mario Bros. 3, click here.


December 8th, 2005 at 10:15 am
Let’s Convert Famicom Cartridges Into NES Game Paks
Last month the secrets of the Nintendo Famicom to Nintendo Entertainment System adapter hidden inside early copies of Gyromite came to the light of day, and now VintageComputing.com takes a second look at the technology by performing a permanent
December 8th, 2005 at 4:05 pm
[…] man, i just love this when ppl are being creative with old console hardware, or in this case software. makes me always feel so nostalgic….anyways, the geniuses over at vintagecomputing.com made an DIY Guide based on an earlier article, how to rebuild some of your favorite japanese famicom games into a NES cartridge using the gyromite import adapter. in this case it’s the cool super mario bros. 3 […]
December 19th, 2005 at 3:31 pm
I went out and got a copy of SMB3 for Famicom because of this article.
December 19th, 2005 at 4:03 pm
Cool, man. It’s neat to see the differences between the two versions (even if they are kind of minor). Are you planning on doing a conversion yourself?
December 19th, 2005 at 7:31 pm
No but it is fun super fun. I like the fact that it is a lot harder since you go back to small Mario when you get hit.
January 10th, 2006 at 7:44 pm
I have converted some famicom games successfully using the converter inside the gyromite game. And once I converted the game to an American
nes game I used a game genie,it works on mostly all the games.
January 15th, 2006 at 6:35 pm
Hey Marco, do you have AIM? I’m gonna’ go buy some gyromite carts in the near future and maybe you’d be able to assist me when I convert famicom games.
January 15th, 2006 at 6:49 pm
So my Famicom to NES conversion tutorial’s not good enough for ya, Haaru? (…the article that these comments are attached to. If you read it, it tells you all you need to know about the process — complete with pictures). Also, I have an article on identifying which Gyromite carts have adapters in them, just in case you missed it: http://www.vintagecomputing.com/index.php/archives/23
Good luck, and let us know how it goes. I’ll be happy to help you as well if you need some tips.
June 8th, 2006 at 9:37 am
Wow! This is awesome. I think I need to pick up an extra copy of Splatterhouse Wanpaku Graffitti for conversion. I only have one question; how much space does the top part of the label take up? I mean the part where you read the name of the game when it is placed in your front loading NES. I came up with 3/5 of an inch, but I’m not quite sure of it.
June 8th, 2006 at 4:32 pm
Lance,
I’m not sure exactly..I would have to find my measurement notes again. But the absolute best answer for you I could come up with is to use a ruler. 🙂 Good luck, and let us know how it goes!
September 24th, 2006 at 2:57 am
ok RedWolf, what do I have to do to get you to send me that label you did? It’s amazing and I need it for the cart I just made, which by the way thank you this was very helpfull.
Drop me a line at TheFirstNightmare@yahoo.com
Thanks!
Jonny
September 25th, 2006 at 1:40 am
Glad you liked it, Jonny! I guess I should have put up the label to begin with. I’ll try to remember to either put it up or email it to you soon, but if I don’t, prod me a bit to remind me. Thanks.
September 26th, 2006 at 9:20 pm
Excellent article; I would have never known! I do have a question, though. Are there any other games besides Gyromite that have the converter?
September 26th, 2006 at 9:35 pm
S0nikboom,
Glad you liked the article. For more info on game converters inside carts, check out this article:
http://www.vintagecomputing.com/index.php/archives/23
Anyway, to answer your question, I’ve heard of converters inside other early Nintendo-published games like Gumshoe, Duck Hunt, and Excitebike. There might be others as well. I think someone may have commented on it on that article I posted the link to above.
Good luck, and let us know if you find any! Thanks again.
September 28th, 2006 at 3:46 pm
Hey Redwolf,
This is me prodding you for the label…. I’m not very good at this.
Jonny
TheFirstNightmare@yahoo.com
September 28th, 2006 at 6:06 pm
Jonny, thanks for the prod. I put an “update” at the bottom of the article that contains a link to the final label. Good luck, and please let us know how it goes!
October 1st, 2006 at 2:53 pm
Hey Redwolf,
It isn’t going good, not even close. That’s why I must ask you the favor possible. Could you mail me a label? I’ll pay for the paper and the stamps and whatnot. I finished building the cart and it works great (thanks to you) but I gotta have that label! Lemme know if you can help one gamer to another.
Jonny
TheFirstNightmare@yahoo.com
October 13th, 2006 at 12:28 pm
Hey dude, I want to do the same with my games, well not the same, i want o restore them, do you know where can i find label scans of NES games? i have in my collection a couple o carts that need a new label. btw what kind of paper did you use?
October 13th, 2006 at 12:36 pm
I have no idea where you can find label scans. There might be a site out there that has some (try Google), but I’ve never seen one. The closest you might be able to get are high quality cartridge scans, and even then, they didn’t likely scan the spine part of the label.
I used a self-adhesive Avery mailing label with a peel off self-adhesive laminant film on top (put on after I printed on the Avery label). This method results in a pretty thick label and it’s no where as efficient as something like a UV-resistant sticker would be, if you had the capability to print high quality glossy stickers. I don’t recommend trying to “restore” your NES labels unless you have such a capability, because my technique could never compare to a professionally printed sticker. The only case where I would try it is if you have carts without labels at all, or if the labels are so messed up that they’re unreadable or nasty.
Good luck!
November 12th, 2006 at 4:24 pm
so by doing everything you told me, I have converted successfully my copy of Super Mario Brothers 2 japan. (The one that was not avalible in the US)
It plays AMAZINGLY!!!
It’s truly the gem of my collection. I’ll post a pic soon when I’m finished with the label!
November 13th, 2006 at 7:58 pm
That’s awesome, man. Please share your label with us! I wouldn’t mind making one of those myself (always have wanted to), if I could get my hands on a SMB2J cart.
November 20th, 2006 at 11:16 pm
I can help you get a SMB2J cart buddy, Just let me know and I’ll contact my source.
We’ll, here’s the original label.
http://i23.photobucket.com/albums/b395/MrShowtime/smb1_2.jpg
and there’s the new NES label.
http://i23.photobucket.com/albums/b395/MrShowtime/smb1_2.jpg
Please tell me what you think!
November 20th, 2006 at 11:19 pm
Awesome work, but it looks like you posted the same label twice.
November 20th, 2006 at 11:21 pm
AW CRAP! I messed up the links, sorry. Lemme try again.
I can help you get a SMB2J cart buddy, Just let me know and I’ll contact my source.
This is the original Famicom disk system label.
http://i23.photobucket.com/albums/b395/MrShowtime/smb1_2.jpg
Here’s the Famicom hack cart label. (NOTE: SMB2J NEVER came out for the Famicom, only the disk system.)
http://i23.photobucket.com/albums/b395/MrShowtime/53_1.jpg
Here’s the new Label I designed.
http://i23.photobucket.com/albums/b395/MrShowtime/SMB2J.jpg
I’ll post the final project when I’m finished.
Lemme know what you think!
November 23rd, 2006 at 12:37 am
Are there any other games besides Gyromite that have the converter?
November 23rd, 2006 at 10:23 am
paper shredders,
I believe I answered that above already:
http://www.vintagecomputing.com/index.php/archives/39#comment-6631
January 13th, 2007 at 1:29 pm
Hey this Marko, the great super mario bros game genie codes creator, This message only partains to the subject of Red Wolf’s great game conversions with the Nes famicom converter found in gyromite and stack up. You can convert a game in style,, by making the shell gold using the
legend of zeda and zeda 2 cart shell. You will need a tool bit to open these games. Once you open them up with the tool bit srew driver you can put the famicom converted game with the converter inside. Now taking off the stickers in the zelda nes games is a pain in the neck, but it is worth it if you want to customize and impress any nintendo fan.
Here is the insane way I took the stickers off to leave it gleaming gold shiny without scratching the precious gold color. You must have nails to peel of the stickers. Put some alcohol on the sticker and leave it to soak, so when you peel it will be less unforgiving on your nails. I did this for about 3 hours peeling and put alcohol and scrape at that old glue. It will come off. And also alot of buffing with a several socks to leave it gleaming. By the time you finish your finger tips should hurt like hell, but it will be worth it. Anyone that has a better suggestion of taking the stickers off without so much pain and time let me know. If anyone does not understand a thing I said email me.
Another great discovery I made or I’m sure some else aready has caught on is they still make famicom games right now as we speak. The reason I know for sure is that. You can buy a Super Joystick ( Power Player ) as it is called. And you can remove the small famicom chip underneath it. Some do not have it and some do. The Super Joystick looks like an
N64 controller. You can remove the chip and convert it ,like Red Wolf has it shown in his Super Mario 3 famicom segment. So now you can have a customized multicart to play on any NES instead of on the Super Joystick.
If anyone does not understand what I said in the last two articles email me at ”’ marko221577@sbcglobal.net
January 13th, 2007 at 1:42 pm
Marko,
Thanks for your tips. As I said in the article (around the 4th paragraph), lighter fluid (naptha) works best for removing sticky labels with minimal effort. The adhesive dissolves in the naptha and you can just peel the label off. Read the article to find out more.
October 5th, 2007 at 1:09 pm
I just noticed you spent all that time making a nice FC to NES conversion yet left the EB Games price tag on the back, lol. Get some rubbing alcohol and take that bish off!
October 5th, 2007 at 2:47 pm
Heh, you’re right, douche (if that is your real name). Didn’t even notice. 🙂
October 20th, 2007 at 10:49 am
Hey now!
I have posted in a while but I had some cool news I want to share.
I’ve now successfully converted 3 Famicom games now. Super Mario Bros 3, Super Mario Bros 2, and Super Mario World. Yeah, that right. Super Mario WORLD.
Check out the link for info:
http://www.bripro.com/low/obscure/index.php?page=hko_smw
Pic of the cart I have:
http://i23.photobucket.com/albums/b395/MrShowtime/100_0246.jpg
so using the formula RedWolf did on his Super Mario Bros 3 label I created my Super Mario Bros 4 label.
http://i23.photobucket.com/albums/b395/MrShowtime/SuperMarioBros4Labelcolor.jpg
I have let to print up the new label yet but here’s a shot of my finished Super Mario Bros 3 and Super Mario Bros 2 carts.
http://i23.photobucket.com/albums/b395/MrShowtime/100_0248.jpg
I’ll be sure to send you a pic of the finished product but until then, here’s a pic of my next project… at lest when I can find myself another damn Gyromite converter!
Jonny Ruckus “S-Mart Ash”
October 21st, 2007 at 11:02 am
Those labels look awesome, Jonny. Great work — thanks for sharing.
May 24th, 2008 at 1:31 am
I have always wondered why Famicom cart are smaller than NES cart? the board inside both carts are just the same size!
July 29th, 2009 at 2:23 am
If you guys are realy into retro-gaming , ya shall just order a Famicom . I got one from Japangamestock.com , I got mine for like 55USD , shiped . They also got plenty of games , got a megaman 2 for like 15USD , and arkanoid for like 5USD .
September 10th, 2009 at 3:21 pm
Where can i Buy Blank Grey nes Cartridges?
September 10th, 2009 at 3:24 pm
Jahavad,
You can buy emtpy, new NES cartridge cases here (RetroZone):
http://www.retrousb.com/index.php?cPath=24&osCsid=8f1556d5f371c070dd1bef450ae07091
But they’re not grey.
December 16th, 2009 at 11:30 pm
I’m going to do the same thing, except with devil world
March 22nd, 2010 at 12:27 pm
Hey Jonny aka S-mart Ash,
Do you still have a contact to get copies of SMB2J? I bought a Gyromite that has the adapter, and would LOVE to build this game for my fiance for his birthday. Also, if you could email me the label for Mario 2, that would be AMAZING.
Please let me know! yo_yo_gurl2 (at) hotmail.com
January 18th, 2016 at 7:13 am
I think converting them back to 60pin makes more sense.
10nes was a mistake. A horrible, horrible mistake.